

If you’ve ever opened a 3D slicer before, then you’ve probably realized there are tons of different settings you can change. And while they all matter, few settings are as important as those related to print speed.
Settings in this category, including the main “Print Speed” setting, control how fast your model is printed, which affects the print time and print quality.
The best 3D printing speed for PLA and ABS is in the 45-70 mm/s range. And, if you’re printing PETG, 40-50 mm/s should work well, yielding high-quality prints with minimal stringing.
But that’s not all! You can also change the other print speed settings, like wall speed and top layer speed, to further control the print time and quality.
Want to learn more about print speed and the best settings? Just keep reading!
Table of Contents
What is Print Speed?

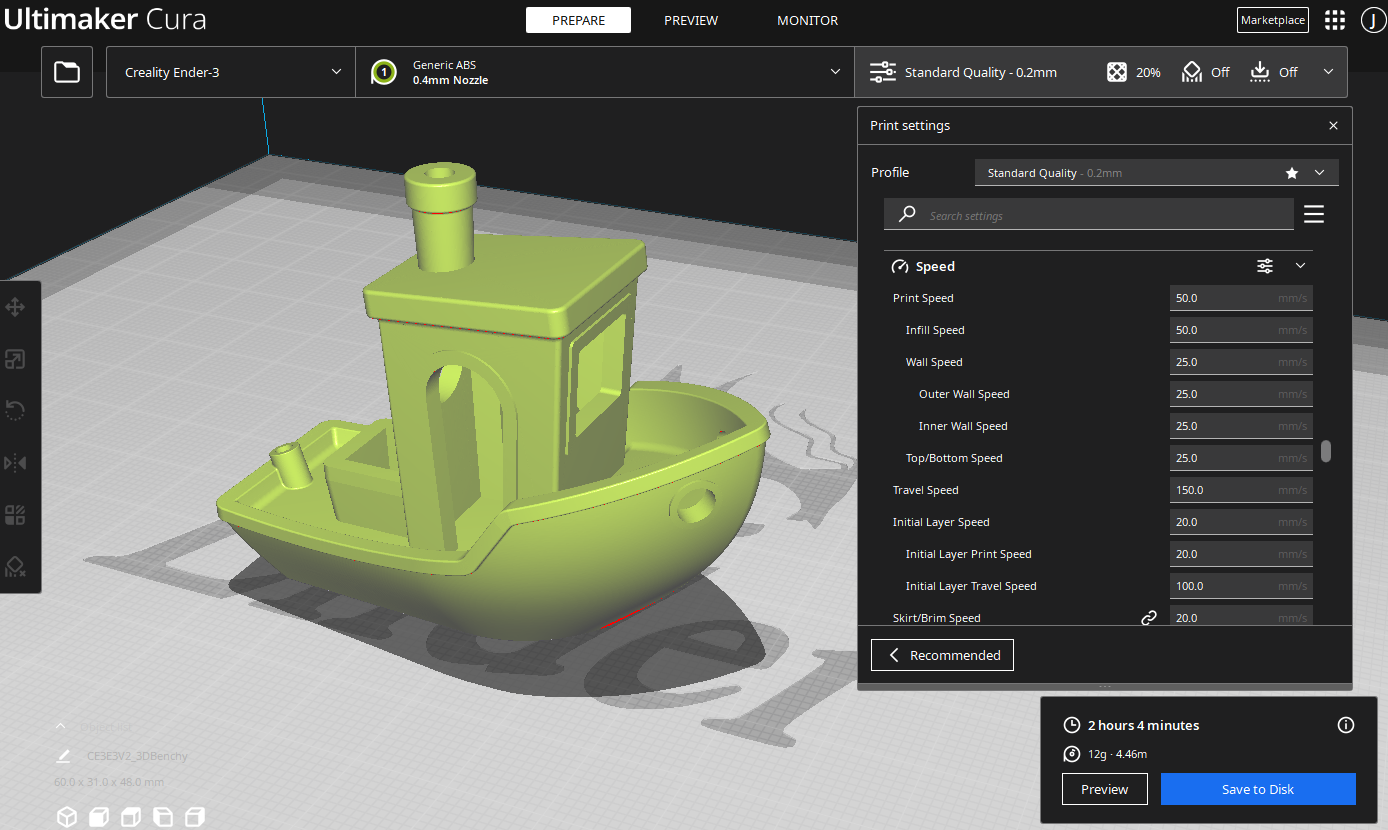
Print speed is a category of settings found in 3D slicers (e.g. Cura) that controls how fast your 3D printer prints your desired model. The higher the 3D printing speed, the faster the printhead moves, the faster filament is pushed out, and the less time prints take.
In most slicers, there is a single setting called “Print Speed” which controls a handful of other types of speed settings, such as infill speed and wall speed. Changing the “Print Speed” value will automatically change the other speed settings accordingly (usually based on a fraction).
So you’re not confused throughout the rest of the article, when we say “Print Speed”, we are referring to the specific “Print Speed” setting and not the other print speed settings.
Why is Print Speed Important?
Print speed is important because it is one of the main groups of settings that contributes to how long a print job takes. Moreover, if you change the print speed, the print time will also change.
But that’s not all. As we’ll go over later, 3D printing speed also has an effect on the quality of prints. That’s because higher print speeds typically lead to a higher chance of printing issues and defects that hurt the quality of the model.
Because print speed has very significant effects on the outcome of your 3D print, it’s vital that you use the right speed settings in your 3D slicer!
What is the Best 3D Printing Speed?
The best 3D printing speed for your printer depends on a handful of different factors, like the type of extruder and nozzle diameter on your printer. But the most important factor for determining the best 3D printing speed is the filament material.
Different filament materials, like PLA and TPU, can’t always be printed at the same speed. This is due to differences in the chemical and physical properties of each material. And, even with filaments of the same material, there’s no one-size-fits-all print speed value.
However, we can estimate the best print speed for a certain filament material within a range. In the sections below, I’ve provided a range of possible print speed values for some of the most popular filament materials. I suggest trying a 3D printing speed in the range of the filament material you’re using and starting the tuning process from there.
PLA
PLA is easily the most popular 3D printing filament material, and it’s also the material you can print the fastest. I suggest using a 3D printing speed value between 45-70 mm/s, as many users have found success in this range.
I suggest starting with 60 mm/s and adjusting in increments of 5 mm/s. Doing so will ensure that you never over-adjust the print speed and accidentally cause other printing issues.
ABS
While ABS is significantly more difficult to print than PLA because it requires an enclosure, you can actually use pretty much the same 3D printing speed. Moreover, I also recommend using a 3D printing speed in the 45-70 mm/s range and adjusting in 5 mm/s increments.
PETG
PETG is another very popular filament material, but if you want to achieve high-quality prints, you’ll need to use a print speed value a bit lower than you would with PLA or ABS. A print speed of about 40-50 mm/s should work pretty well.
But, if you notice stringing on your prints, consider lowering the print speed by 5 mm/s. Or you can try to preserve the 3D printing speed and fix the problem by lowering the nozzle temperature or increasing the retraction distance.
TPU
TPU is a flexible filament, and, as such, it requires a very low print speed. 25 mm/s should work fine, and you might be able to increase it to around 35 or 40 mm/s. However, don’t try to go above 40 mm/s, as TPU filament might start to cause problems in your extruder or hot end at this speed.
Nylon
Nylon isn’t as flexible as TPU, but it’s still more flexible than PLA or ABS. A 3D printing speed between 30 and 55 mm/s should work perfectly for printing this type of filament. However, feel free to change it in increments of 5 mm/s based on your print results.
PC
Lastly, polycarbonate, or PC for short, needs to be printed much slower than some of these other rigid materials due to the material’s inherent properties. A value in the 25-45 mm/s should work just fine, as long as you take some time to properly tune the setting. Furthermore, I suggest trying out 35 mm/s and then adjusting the value in increments of 5 mm/s based on how your prints come out.
What is the Fastest Print Speed?
The fastest print speed you can use is probably around 100 mm/s if you’re printing PLA and using a very high nozzle temperature.
Of course, not just any stock 3D printer can handle printing PLA (or any other material) at this high of a speed. But, if you fine-tune your slicer profile and are using a hot end and extruder that is capable of high-flow printing, then you might be able to print successfully with 100 mm/s.
But, if you’re just printing normally and are wondering how fast you can go without any significant changes or a lot of tuning, then 70-80 mm/s is your answer. At this speed, your prints might be a little bit lower quality, but your printer probably won’t break or completely fail.
Check out our related article on the fastest 3D printers here.
What Happens if You Print Slow?
Printing slowly is one way you can try to achieve higher-quality prints. That’s because when the printhead has more time to lay down each layer, the layers have more time to solidify and cure, leading to prints that look better.
However, printing too slowly can also cause issues. If not enough filament is being pushed through the nozzle, then heat will creep up the hot end assembly and cause a clog. This phenomenon is known as “heat creep” and can be prevented by increasing your 3D printing speed.
Check out our article on how to speed up 3D printing here to avoid this issue.
What Does Print Speed Affect?
Print speed can have a very big effect on your 3D prints. I’ve gone over the two main areas of impact of the print speed setting below:
Print Time

PRINT TIME
The first and most obvious effect of changing the print speed setting is the print time. As you probably figured out, the faster the printhead lays down filament, the faster your 3D model is completed.
However, you might be a bit surprised at the small effect changing the print speed has on the estimated print time. Moreover, a more effective way to cut down the print time is by increasing the layer height or shrinking your 3D model.
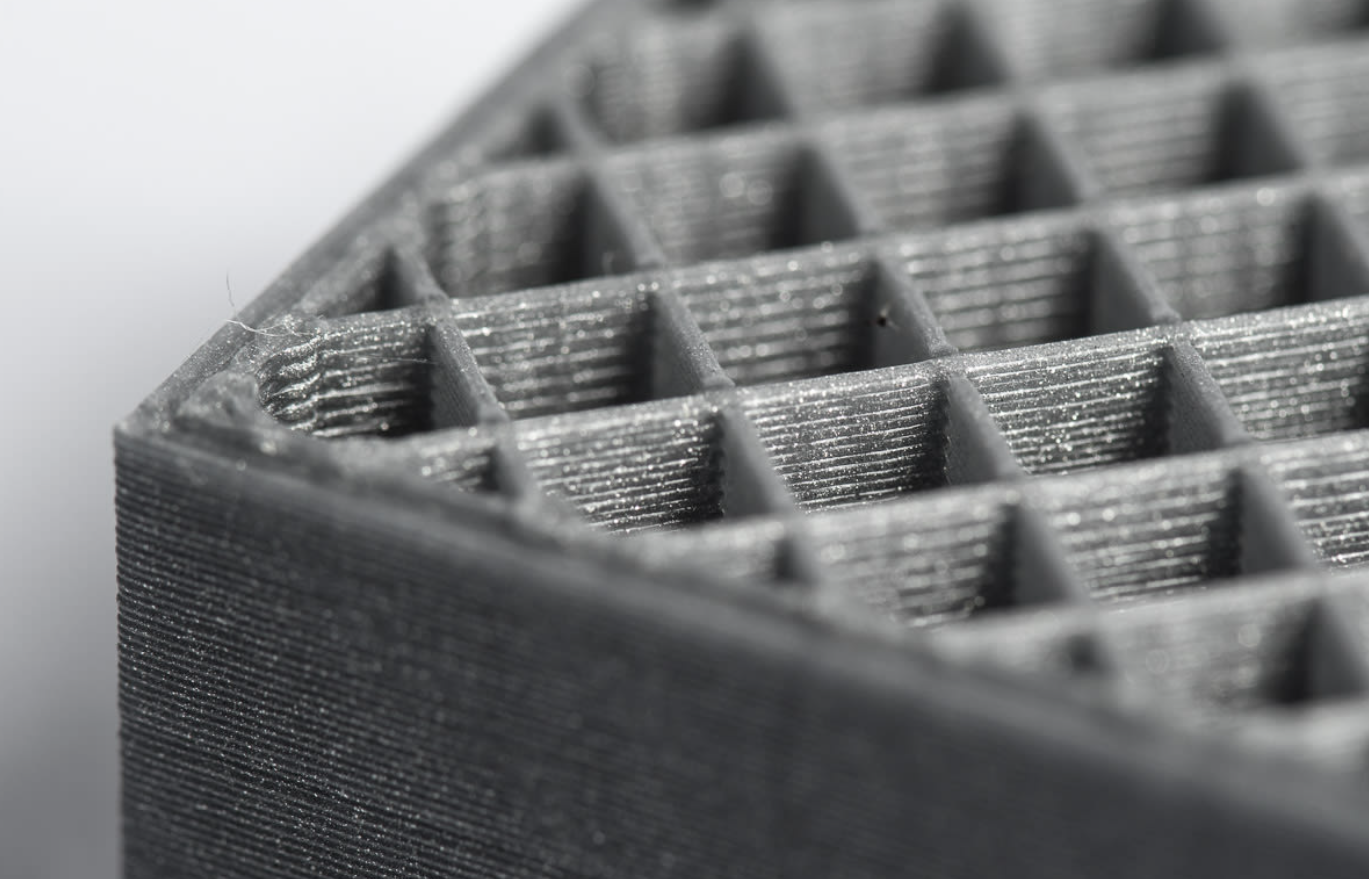
Print Quality

PRINT QUALITY
Changing the print speed can also affect the quality of prints. Moreover, the correlation between print speed and print quality is direct, so increasing the 3D printing speed is likely to lead to a drop in print quality.
However, you can manage the effect that print speed has on print quality through other slicer settings. For example, increasing the nozzle temperature with an increase in the 3D printing speed will help prevent under-extrusion and other printing issues to help increase the print quality.
The moral of the story: when you change the print speed, try to optimize the other slicer settings to ensure that you don’t experience a big drop in print quality.
Types of Print Speed
In any 3D slicer, there are a handful of different print speed settings. Each covers a different type of print speed based on what section of the print is being printed. I’ve gone over the main types of print speed in the sections below.
Print Speed
First, we have the print speed, which is the main setting for controlling the speed of the printing process. Moreover, the print speed value determines how fast the printhead moves across the X and Y axes of the print area. The higher the speed, the faster the printhead moves and the less time your print job takes to complete.
The print speed acts as the parent setting for most of the other speed settings, like infill speed and wall speed. This means that the values of these other types of print speed are derived from the value of the print speed setting. So change this setting, and all of the other ones will change accordingly.
Because it’s the parent setting, this is the most important speed setting to get right.
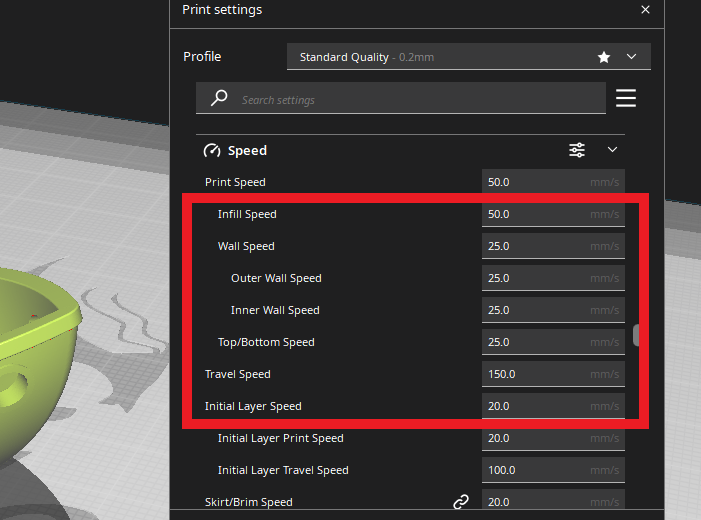
Infill Speed
Infill speed controls how fast the printhead moves (the print speed) during the infill section of a print. For reference, infill is the internal filling inside a 3D model, so this speed value is referenced (used) by your printer every time it’s printing an infill structure, which is a large portion of a 3D print job.
In most 3D slicers, the infill speed is automatically set equal to the value of the main print speed setting.
Wall Speed
Wall speed is the print speed when the printer is making the walls of a 3D printed model. The walls are what contain the infill structures of a print, so it’s very important that the wall speed is set correctly. Otherwise, the outer sides of your model might look bad.
The wall speed is usually split into two settings: inner wall speed and outer wall speed. Splitting the settings this way allows you to use a faster speed on the inner wall because you won’t see it once the print is done and then use a slower speed for the outer wall.
Most slicers automatically set both wall speed settings to one-half of the main print speed setting. However, personally, I like to drop the outer wall speed so that it’s 5 mm/s less than one-half of the main print speed. I also increase the inner wall speed by 5-10 mm/s from one-half of the main print speed setting, as this helps speed up my prints.
Top/Bottom Speed
Just like walls contain the infill of a model from the sides, the top and bottom layers of a model cover a model’s infill from above and below. And, as you probably guessed, the top/bottom speed is the speed for the top and bottom layers of a 3D print.
I like to keep the top and bottom speed settings at a little over one-half of the main print speed setting. This is a little higher than Cura’s default value of exactly one-half of the main print speed setting. But, adding 5-15 mm/s to this default value isn’t likely to cause any issues with your print and will speed up the printing process.
First Layer Speed
Next, the first layer speed, sometimes called the initial layer speed, is another speed setting, and it controls how fast the printhead is moving during the first layer of a print. If you’ve ever worked with a 3D printer before, then you probably know how important getting the first layer of a print right is. Because of this, it’s equally as important to use a good first-layer speed setting.
The first layer speed should always be slower than every other speed setting. I like to use the Cura default value of 20 mm/s, no matter what filament material I’m using.
While you might be thinking, “20 mm/s is super slow”, well, you’re right. However, it’s only for one layer, so it won’t significantly increase your print time.
But, if you rush the first layer, your print will likely fail. Because of this, I suggest staying on the slow side of things to be safe and never going above 20 mm/s.
Travel Speed
Next, the travel speed dictates how fast the printhead moves during travel or non-extrusion moves. For example, if you were printing two models at once, when the printhead is moving between the two items (and not extruding filament), that is a travel move.
Believe it or not, travel moves make up a lot of the movement of your machine’s printhead. As such, travel speed is very relevant when it comes to print time.
Cura’s default value of 150 mm/s for the travel speed works pretty well, but you can definitely go higher. If your printer is a Bowden extruder printer, then feel free to go as high as 200 or even 220 mm/s. But, if you’ve got a direct drive 3D printer, like the Ender 3 S1, due to the heavier printhead, you should try to stay closer to 180 mm/s.
Retraction Speed
Retractions are when your 3D printer pulls back filament from the hot end to relieve the nozzle of built-up pressure from the constant extrusions. Retractions happen basically every time the printhead makes a travel move, and the retraction speed controls how fast they happen.
While retractions don’t make up a significant amount of the print time, increasing the retraction speed can still help reduce the time prints take. Also, a higher retraction speed can help reduce stringing in prints. I recommend going with a retraction speed of around 40-45 mm/s, as this is pretty fast and also helps with stringing.
Conclusion
Overall, print speed is one of the most important and impactful categories of print settings. The main reason you should change the setting is to cut down the print time of a model, but you can also change the print speed to solve issues with print quality.
While there’s no single best print speed because many factors play into what value works best, there are ranges based on the filament material you’re using.
If you’re printing with PLA, then a print speed of 45-70 mm/s should work pretty well. The same goes for ABS, as the material is very similar. But, if you’re printing PETG, 40 to 50 mm/s should work better and reduce stringing in your prints.
You also should consider changing the other print speed settings besides just the main “Print Speed” setting. Furthermore, increasing the inner wall speed by 5-10 mm/s and the top/bottom speed by 5-15 mm/s from their default values will help speed up prints a bit. And lowering the outer wall speed by 5 mm/s from the default value will make your prints look a bit better.