

If you’re anything like me, convenience is everything.
The only thing I hate more than leveling the bed is that walk back and forth between my computer and 3D printer every time I want to start a print. Luckily, I have a little friend called OctoPrint that makes my 3D printing experience a million times easier.
OctoPrint allows me to start and stop prints even when I’m not right next to my 3D printer through the OctoPrint online interface. And I no longer have to worry about whether my print is going well because I can just whip out my phone and look at the camera stream feature.
Now you might be thinking that OctoPrint must be super expensive or difficult to install if it helps this much. But you’d be wrong because you can add OctoPrint to your 3D printer with just a Raspberry Pi board and 20 minutes of your time.
Interested in unlocking the life-saving features of OctoPrint? In this article, we’ve explained, step-by-step, how you can setup your own OctoPrint server with your printer!
Table of Contents
What is OctoPrint?
Before we get into the necessary materials and the installation tutorial, though, you might be interested in learning more about this God-like assistant called OctoPrint.
Originally developed in 2012 by a fellow 3D printing enthusiast Gina Häußge, OctoPrint is a remote printer control program. As such, it connects to your printer and lets you do anything you normally would on your machine’s LCD, but remotely, through an online interface.
OctoPrint functions like a server because it runs on a computer that can be controlled through the internet. Most people use single-board computers to host the server as these boards are pretty inexpensive but still have the computing power necessary to host the server.
The computer is connected to the motherboard of the 3D printer as well as the internet, which is how commands can be sent from your phone to your printer.
Raspberry Pi boards, such as the Pi 3B+ and Pi 4B, are the most popular type of computers used for OctoPrint. And, for these boards, an operating system called OctoPi is used to run the server.
OctoPrint has tons of features, such as:
- Start/stop prints
- Adjust temperatures
- Watch a connected camera
- And more
And, because OctoPrint is open-source, there are also many plug-ins developed by community members which expand the usefulness of OctoPrint. Moreover, some popular plug-ins allow you to control an automatic bed leveling sensor, adjust the Z-offset, and slice models on the web, to name a few.
What You Need to Set Up OctoPrint
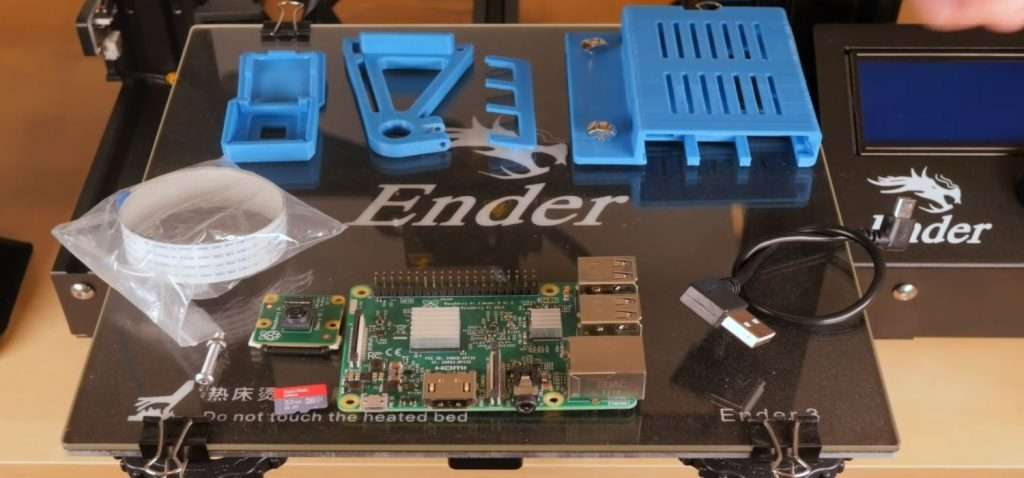
As we mentioned, setting up OctoPrint isn’t as complicated as it may seem. We’ve listed the necessary materials for adding OctoPrint to your 3D printer (with a Raspberry Pi board) below:
- Raspberry Pi board (e.g. Raspberry Pi 3B, 3B+, 4B)
- Raspberry Pi power supply (5V 2.5A)
- 2x Micro-SD card (1 for your printer and 1 for your Pi board)
- USB Micro-SD card reader
- Micro-USB cable (or whatever port your printer’s motherboard has)
You’ll also need a running computer, like a PC or laptop, that has the following programs installed:
- Basic web browser (e.g. Chrome)
- Raspberry Pi Imager
While this is the necessary equipment for the upgrade, if you want a camera to watch your printer, you’ll need to also purchase a USB webcam or a compatible Raspberry Pi camera.
Additionally, you might want to 3D print a case for your Pi board and camera to make the setup look nice.
Once you’ve got everything ready, it’s time to get started!
Setting Up OctoPrint Step-By-Step Guide
Now, it’s time for the step-by-step tutorial for you to install OctoPrint. First, I just want to remind you that this tutorial is for setting up OctoPrint on a Raspberry Pi board. If you’re using a non-Raspberry Pi board, then OctoPi, the operating system we’ll be using, might not support the board.
Before you continue, you’ll also want to make sure that your printer supports OctoPrint. While most consumer-grade printers, like the Ender 3 and Anycubic i3 Mega, support OctoPrint, it’s not a guarantee.
Some 3D printer manufacturers, like Makerbot, have hardware and firmware regulations on their machines that prevent OctoPrint from connecting to the printer’s board. A simple web search of “does OctoPrint work with <insert printer name here>?” will help you find the answer.
And, once you’ve confirmed your printer works with OctoPrint, it’s show time!
Step #1: Flash OctoPi to the Raspberry Pi

The first step in the installation process is to flash OctoPi to your Raspberry Pi board. As a reminder, OctoPi is the operating system that will allow your Pi board to serve as an OctoPrint server. And “flash” is the term we use to describe writing a new operating system to the board’s memory.
To flash OctoPi to the Pi board, get out your PC or laptop and insert the Micro-SD card for your Pi board into the USB reader. Then, open the Raspberry Pi Imager program, and click the “Choose OS” program.
Next, scroll down in the options and find the “Other specific-purpose OS” category. Inside this section, click “OctoPi” and select the stable version of the OS.
Now we’ve got the OS ready to flash to the inserted Micro-SD card. But don’t do it just yet because we’ve got to setup the network connection in the next step!
Step #2: Connect the Board to Wi-Fi
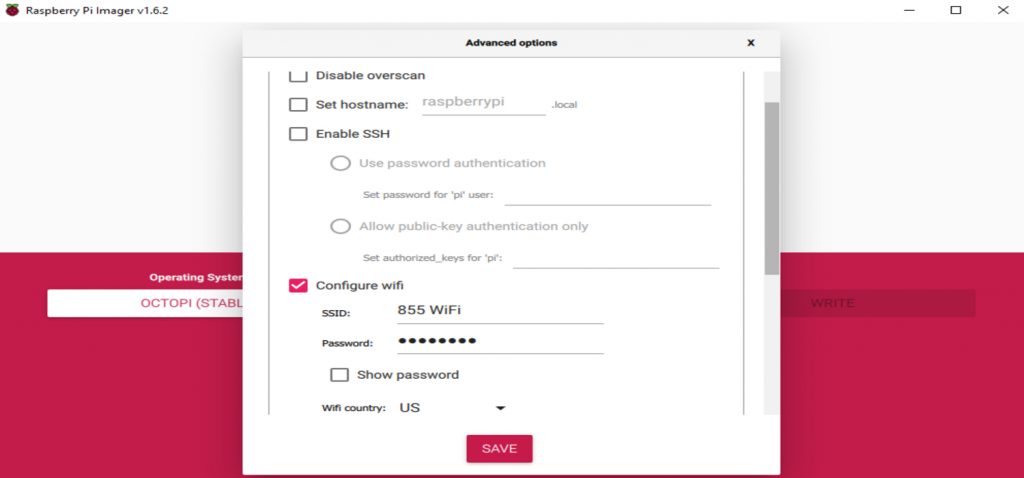
The second step is to setup the OS so that the Raspberry Pi board connects to the Wi-Fi. This step is only necessary if you plan on using Wi-Fi and not a wired Ethernet connection (preferred, but not always possible or convenient).
In the early days of OctoPi, this needed to be done by manually adjusting the text in the network files of the OS package. However, now that the Raspberry Pi Imager program supports OctoPi, you can setup the network connection much easier.
All you have to do is, in Raspberry Pi Imager, use the Ctrl+Shift+X key combination to open up the advanced options menu for your selected OS. Then, scroll down to the “Configure wifi” section, and make sure it’s enabled.
Then, make sure that the SSID and password are entered correctly for the Wi-Fi network you want the board to be using. Also, don’t forget to set the “Wifi country” to “US” if you’re in the United States.
Then, click the “Save” button, and select the Micro-SD card for the storage device in Raspberry Pi Imager. Finally, click “Write” and wait as the program flashes the OS program to the Micro-SD card.
Step #3: Load OctoPi Onto the Raspberry Pi Board
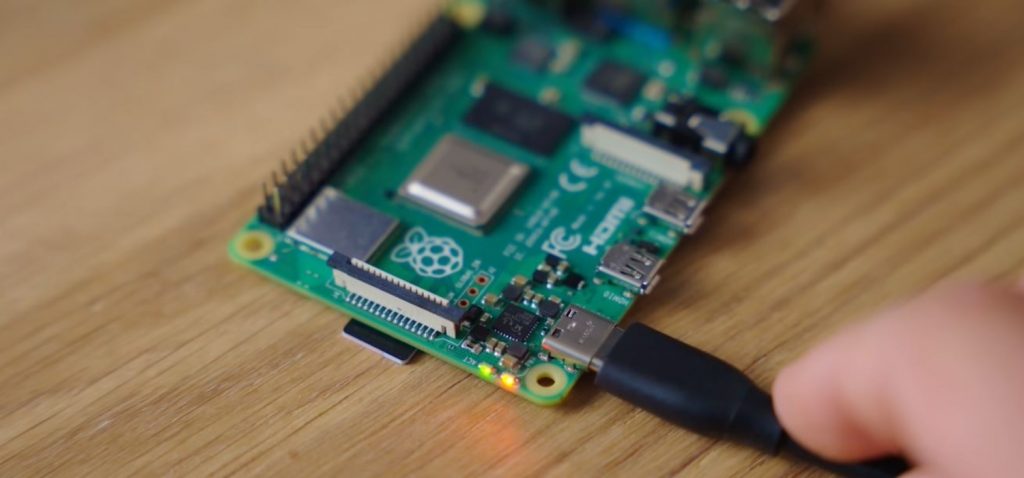
Now that the configured version of OctoPi is written onto your Pi board’s Micro-SD card, it’s time to load it into your Pi board.
All you have to do is insert the Micro-SD card into the slot on the bottom of your Pi board. Make sure that the Pi board is not connected to power and that the Micro-SD card is in the right orientation.
Then, once the card is securely in your Pi board’s Micro-SD card slot, plug the board into the power supply. Wait a few minutes before moving onto the next step because the board needs to process the new OS and set some backend programs up.
Step #4: Find the IP Address
Now that your Raspberry Pi board is powered up and running OctoPi, it’s time to access its remote interface. This is done on your device (PC/laptop/phone) through a web browser, and the URL is the IP address of the internet-connected Raspberry Pi board.
So how do you find it?
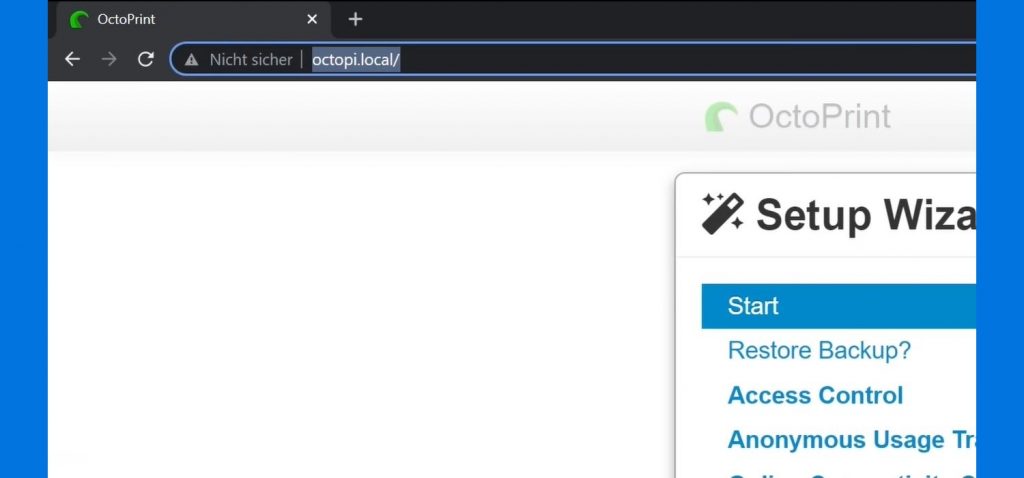
Well, the easiest way is to go to the following URL: http://octopi.local. This site is meant to automatically find the OctoPi-running board’s IP address and go to its online interface. Then, from there, you can bookmark or star the URL of the board’s IP address and come back to it later.
However, for some users, including myself, this doesn’t work. But don’t fear because it’s not too difficult to manually find the IP address.
All you have to do is access your router’s web interface (usually a public IP address), and then look at the IP addresses of the recently-connected devices. For some routers, the device will be labeled something like “OctoPi” which is a clear indicator that you found the right one.
However, for others, no simple name is available. In this case, you can just look at the most recently connected devices and put their IP addresses into a web browser. The one that pops up with an OctoPi interface is the winner!
As I mentioned, make sure to bookmark, save, or star the IP address of the Raspberry Pi board because remembering one is difficult. Note that this IP address might change if your device loses its internet connection and is reconnected, but, oftentimes, this doesn’t happen.
Step #5: Setup the Online Interface
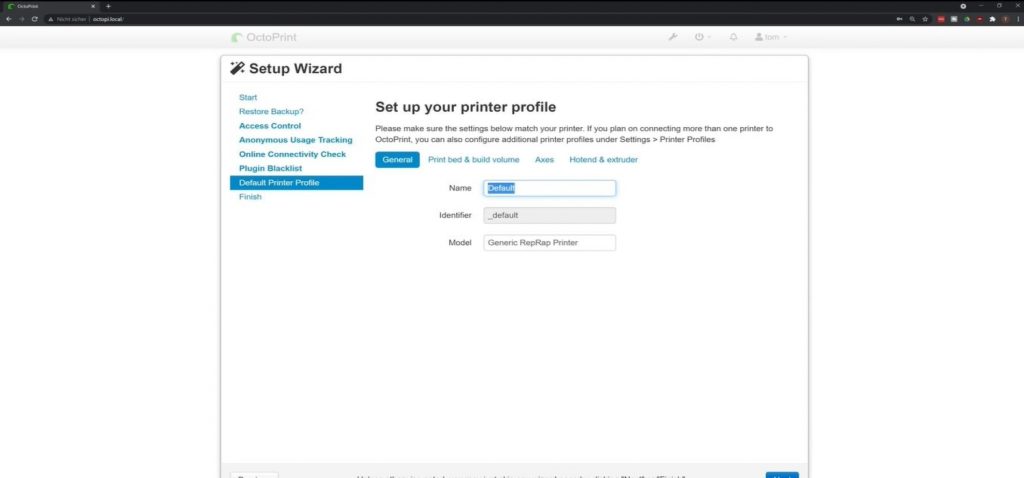
Now that you have the online OctoPi interface, you have to do the initial setup of the platform.
We won’t go into too much detail here because the setup is pretty self-explanatory and the OctoPrint interface guides you through the whole thing. But, overall, what you’re doing is just giving some permissions to OctoPrint (all are okay) and enabling some optional features (e.g. plug-ins).
Step #6 Connect the Pi to Your 3D Printer
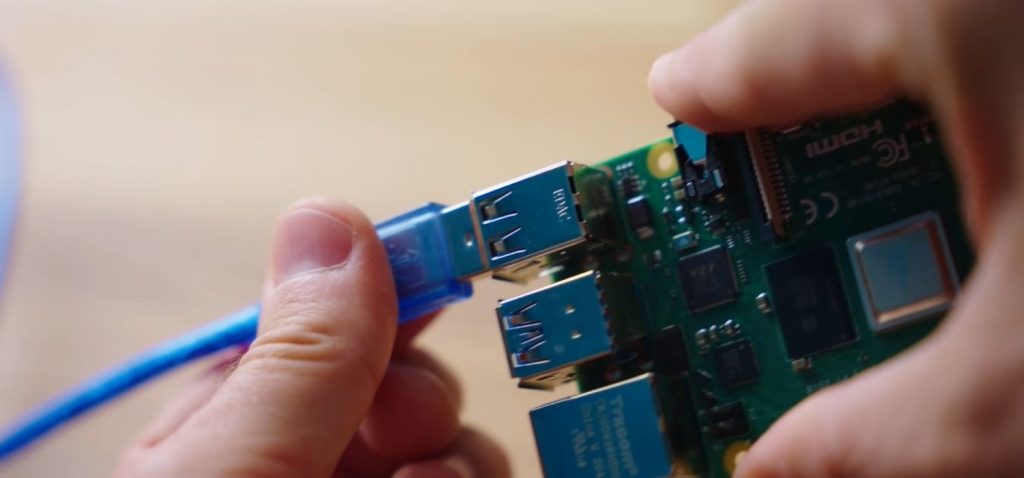
Next, it’s time to connect your Pi board to your 3D printer.
All you have to do is plug the USB Type-A side of your Micro-USB cable into your Pi board’s USB port and then the Micro-USB side into your printer’s motherboard USB port. If your 3D printer’s motherboard uses a different type of USB port, use that type of cable (e.g. USB Type-C).
Then, open up the online OctoPrint interface and look at the left-hand side of the screen. You should see a “Connect” button which you should click. This will enable communication between the Raspberry Pi board and the motherboard of your printer, so you can start using the program’s features.
Step #7: Add A Camera (Optional)
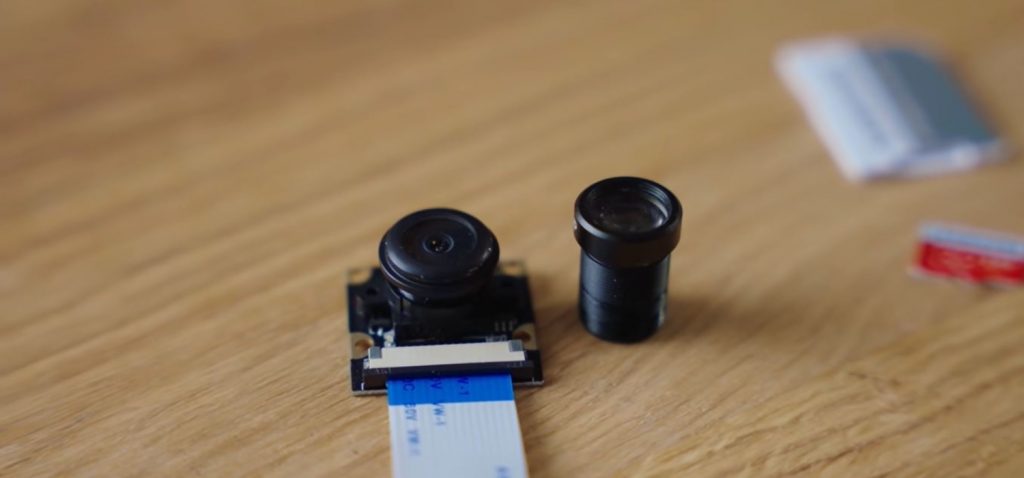
My personal favorite feature of OctoPrint is its camera streaming abilities because I’m always worried about the status of my prints.
During my workday, I often check the camera feed on the online OctoPrint interface and will pause or stop prints if something doesn’t look right. And, if I’m remotely starting a print, I always make sure the bed is clear before sending that file to the printer.
Installing a camera to your OctoPrint setup is very easy and OctoPi supports the official Raspberry Pi cameras as well as 3rd-party webcams. I currently am using a Chinese rip-off Raspberry Pi camera module (ribbon cable connection), but I’ve also used a Logitech USB webcam and other cameras too.
The first step is unplugging the board and removing the Micro-SD card. Then, plug the storage device into a Micro-SD card USB reader on your laptop or PC and open the file explorer. Find the “octopi.txt” file and open it in a text editor like Notepad++.
Locate the following lines and remove the “#” in front of them to uncomment them:
- camera_usb_options=
- camera_http_webroot=
- camera_http_options=
Then, find that first command (“camera_usb_options=”) and locate the script that comes after it (for me, it was “ “-r 640×480 -f 10” “). To achieve the best streaming resolution, replace this string of text with the right settings for your camera. You can find some recommendations for popular cameras on OctoPrint’s camera guide.
Then, save the changes to the file, eject the Micro-SD card from your computer, and load it back into the belly of your Raspberry Pi board. Before you power on the board, plug your camera into the designated port on the Pi (USB or ribbon cable). Then, turn it on and you should now be able to see the camera stream on your OctoPrint online interface.
Can You Use OctoPrint Without Raspberry Pi?
While Raspberry Pi boards are the most popular type of board for running OctoPrint, it’s not the only way to run OctoPrint. You can technically host an OctoPrint server on any computer, from a jailbroken iPhone to a high-end Alienware computer or a Raspberry Pi alternative like a BeagleBone.
The reason these options are less popular, though, is because it’s a bit more difficult to set them up.
Moreover, there’s not always a compatible operating system like OctoPi that works on non-Raspberry Pi boards. Of course, there are some alternatives, such as one for the BeagleBone board, but it’s a hit or miss depending on the board you have.
Is OctoPrint Reliable?
As long as you have a stable internet connection and none of your electronics are faulty, OctoPrint is one of the most reliable friends you’ll ever have. When you need it, it’s there, and when you don’t need it, don’t worry, it’s still there.
Whenever I send a G-code command, start a print, or do anything else through the OctoPrint online interface, it always works.
That being said, I would like to mention that sometimes, starting prints remotely through OctoPrint can cause buffering, where the nozzle pauses as new G-code commands wait on being processed. However, this rarely happens and 99% of my printing experience is normal.
Conclusion
OctoPrint is easily one of the most valuable upgrades you can make to your 3D printer. It’s a true life-saver if you have 3D printing anxiety, want to take cool time-lapses of your prints, or dislike dealing with your printer’s LCD interface.
And despite being such a powerful and useful upgrade, OctoPrint isn’t very difficult to install, especially on a Raspberry Pi board. All you have to do is flash a Wi-Fi-enabled version of OctoPi to your Pi board’s Micro-SD card, locate the URL of the online interface, connect it, and you’re done!