

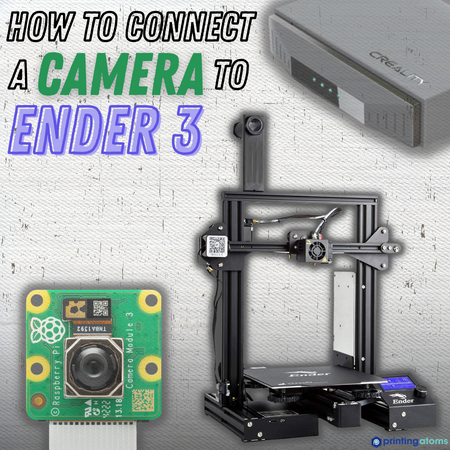
Adding a camera to your 3D printer is one of the best upgrades you can make. It’s perfect for anyone who’s constantly worried if their print is failing because you can use the camera to remotely monitor your 3D printer so you can check up on it even when you’re not at home.
But, if you’re going to add a camera to your 3D printer, like a Creality Ender 3, it’s super important that you set up and mount the device properly.
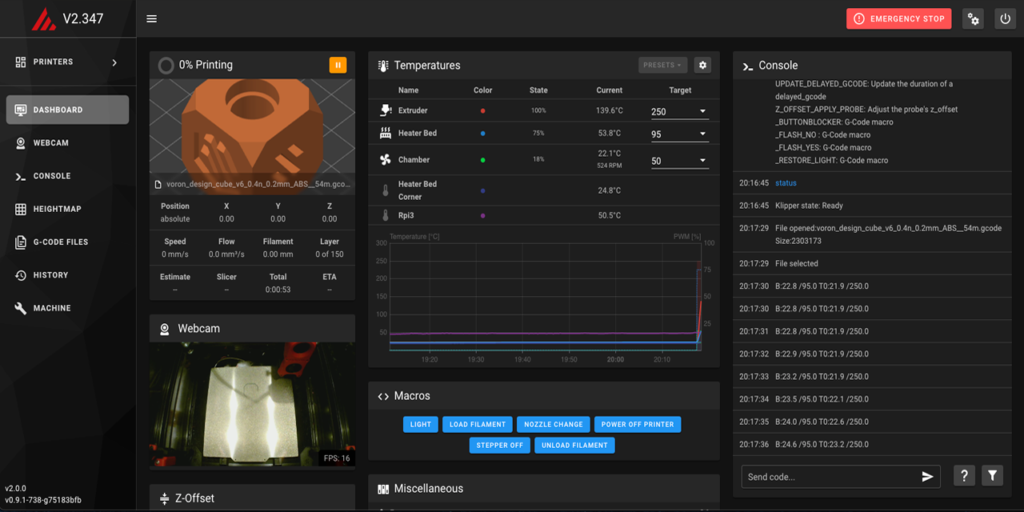
This means setting up the camera on a server, like an OctoPrint server or the Creality Wi-Fi box, so you can remotely stream the camera’s video feed. Additionally, you should position the camera in a good place on your 3D printer so you can see everything that you would want, and not just a limited area of the print bed.
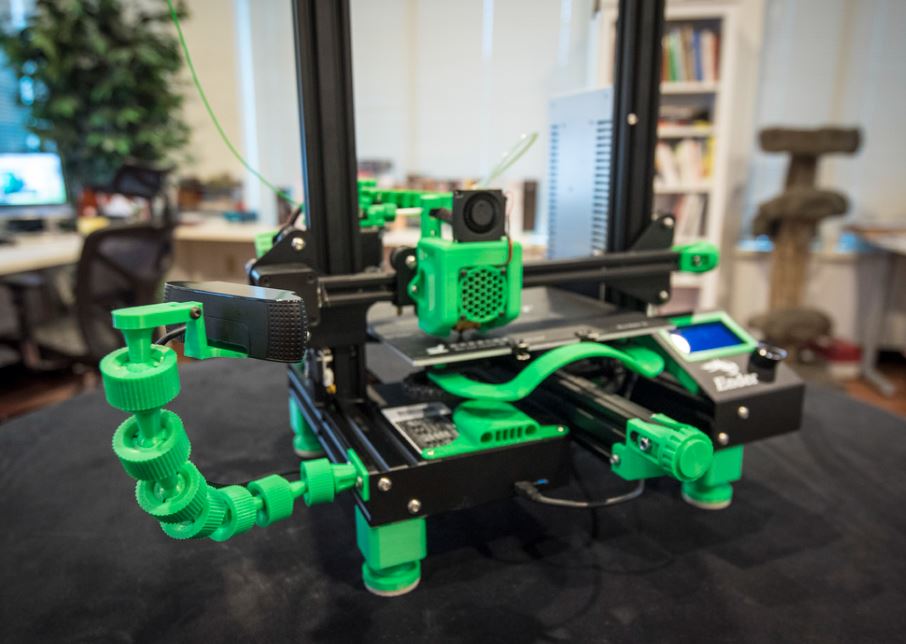
Luckily, because the Creality Ender 3 (Pro/V2/S1) is so popular, there are tons of compatible camera mounts and ways to set up different cameras. Personally, on my Ender 3s, I like to use a Raspberry Pi camera connected to an OctoPrint server that I mount using an articulated arm. However, depending on what you want out of your camera setup, you might prefer a different configuration.
In the sections below, I’ll go over everything related to setting up a camera on the Creality Ender 3, including how to connect one to a server, the best mounts, and the best mounting positions.
Enjoy!
Table of Contents
Why Use a Camera on the Ender 3 (Pro/V2/S1)?
Using a camera on the Ender 3, or really any 3D printer offers many different benefits.
First off, if you set up the camera on a server, as most people do, then you’ll be able to remotely monitor your 3D printer. This means you can watch your 3D printer, whether it’s idle or at work, even when you’re not at home. No more worrying if your house is burned down from a 3DBenchy!
But besides putting your mind at ease, a camera also enables you to make some super cool timelapses of your 3D printer, which you can show off to your friends and family. Many 3D printer servers, like OctoPrint and the Creality Wi-Fi Box, have basic, regular-interval timelapses functions.
But you can also take extra steps to make 3D printer-specific timelapses using a plug-in software called Octolapse (meant for OctoPrint). These special timelapses are more visually-appealing and fluid than a regular timelapse, and you can check out our guide to using Octolapse to learn more about it.
So, whether you want a way to monitor your 3D printer remotely or want to show off your printer’s abilities, getting a camera is the perfect upgrade for your Creality Ender 3 (Pro/V2/S1)!
How to Connect a Camera to the Ender 3 (Pro/V2/S1)
Connecting a camera to the Ender 3 (Pro/V2/S1) is super easy because the large community behind this printer has led to the development of many different server options, like OctoPrint and the Creality Wi-Fi Box. These servers can connect to your 3D printer and provide a platform for streaming the camera’s video feed remotely.
In the sections below, I’ve gone over the different options you have for connecting a camera to your Ender 3 (Pro/V2/S1).
OctoPrint Server
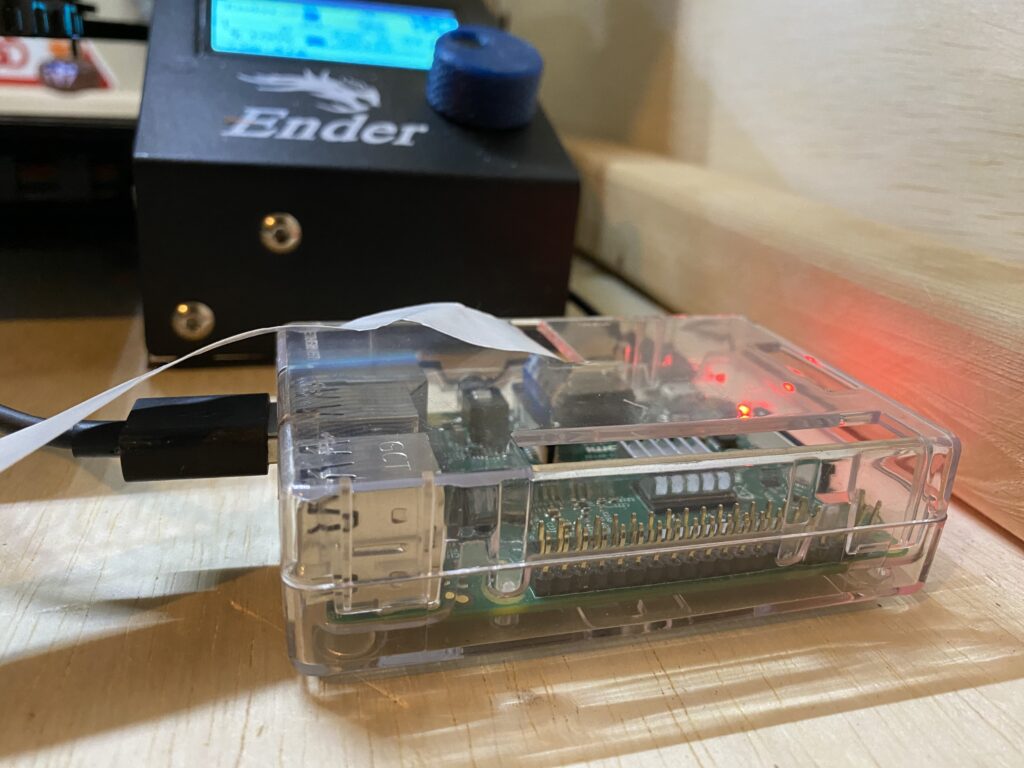
The most popular way to connect a camera to the Ender 3 is with an OctoPrint server. If you’ve never heard of it before, OctoPrint is an open-source 3D printer server software that runs on a computer (usually a Raspberry Pi board) and allows you to remotely control and monitor your 3D printer through a web interface.
Setting up an OctoPrint server is pretty easy, and all you need to do is flash an OS image to your computer (e.g. Pi board), configure the settings for your printer, and connect the computer to your printer’s motherboard via USB. And, OctoPrint works with many different cameras, including Pi camera modules and webcams (e.g. Logitech c920).
Check out our in-depth article on how to set up OctoPrint on the Ender 3 to learn more.
Creality Wi-Fi Box
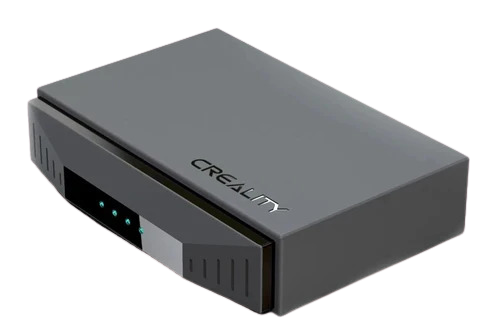
The Creality Wi-Fi Box is a product from Creality (the same manufacturer of the Ender 3) that imitates the abilities of an OctoPrint server but at a super low cost. Like OctoPrint, the Creality Wi-Fi Box is connected to your Ender 3’s motherboard via a USB cable, and there’s an online interface where you can control and monitor your connected printer.
As for camera compatibility, the Wi-Fi Box doesn’t support nearly as many cameras as an OctoPrint server, but it should still work on many USB webcams and Creality-specific cameras.
Klipper Server
Klipper is a special firmware configuration for 3D printers that’s really blowing up in popularity right now. Klipper firmware natively requires a computer board to be connected to the printer’s motherboard, just like an OctoPrint server. Because of this, you can add a web interface for controlling and monitoring your printer to your Klipper setup without any additional hardware.
Some of the web interface options for Klipper include Fluidd, Mainsail, and Moonraker. All of these options support camera feeds, and you can use any camera that’s compatible with your host computer. So, if your Klipper configuration is hosted on a Raspberry Pi 3B+, any USB webcam or Pi module camera should work!
Standalone System
Next, you can use a standalone system to run a camera for your Ender 3.
By “standalone system”, I’m referring to server configurations that aren’t specific to 3D printers like OctoPrint or Klipper servers but still allow for connecting a camera and remotely monitoring the video feed. Standalone systems are common for security camera devices, like the Wyze Cam 3 or the Blink Mini, and, typically, the cameras don’t need to be connected to an external device (e.g. Pi board) to work.
It’s important to note that standalone systems naturally don’t connect to your printer’s motherboard, meaning you won’t be able to control your printer (e.g. start prints) in the same interface that you monitor the video feed of the camera.
Others
Lastly, there are a few other options for running a camera for your Ender 3. I’ve listed a handful of these below:
- Creality Sonic Pad
- AstroPrint Server
- 3DPrinterOS
- Repetier Server
- Printrun Server
Where Should I Mount the Camera?
Once you’ve set up your 3D printer server and connected a camera, you’ll need to figure out where you want to mount your camera on your Ender 3. There are a handful of different options, and each mounting position provides a different viewing angle of your printer, which affects how you will use the camera.
Below, I’ve gone over the most popular camera mounting positions for the Creality Ender 3, as well as each of their benefits.
On the Print Bed
The first place you can mount a camera on your Ender 3 is directly on the bed. In this setup, the camera mount is usually fixed to one of the Ender 3’s bed leveling screws or on a bed handle attachment. And most bed mounts are positioned so the camera sits a few inches above the bed to give you the best viewing angle on prints.
This camera position is usually great for capturing small prints, but the angle is a bit too close to be useful for larger and taller print jobs.
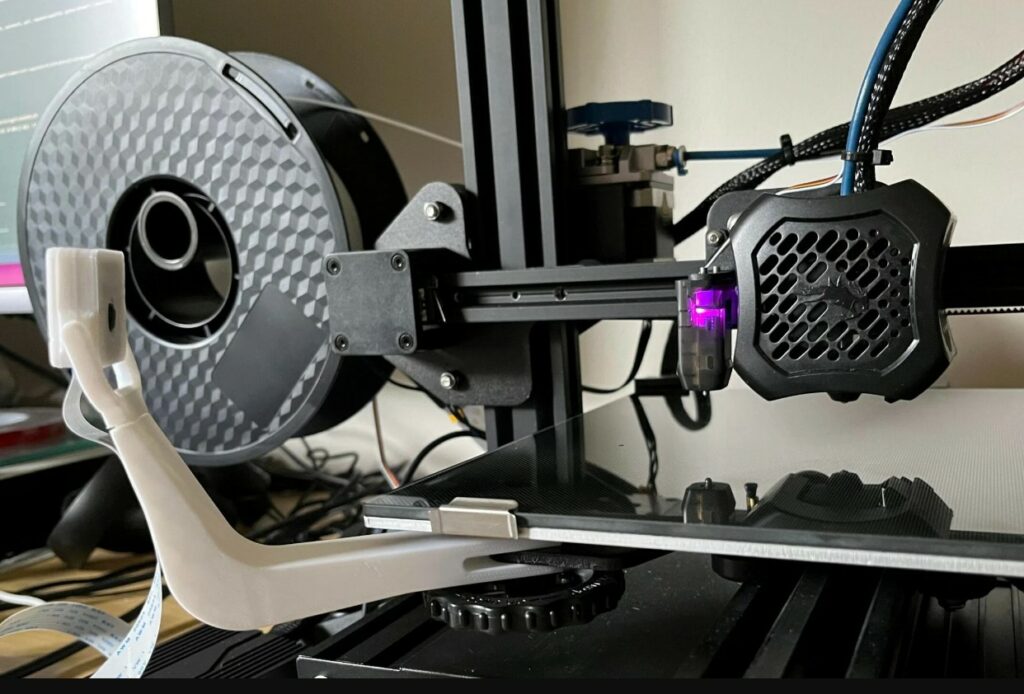
On the X-Axis Gantry

The X-axis gantry on the Ender 3 is where the printhead moves, and there are many camera mounts meant to go here. Usually, if you’re positioning the camera this way, it will be attached to the left end of the X-axis gantry, and the exact angle can be adjusted.
This camera position is great if you’re interested in watching the printhead more up close during each layer of a print. As such, the X-axis gantry isn’t the best mounting position for taking timelapse.
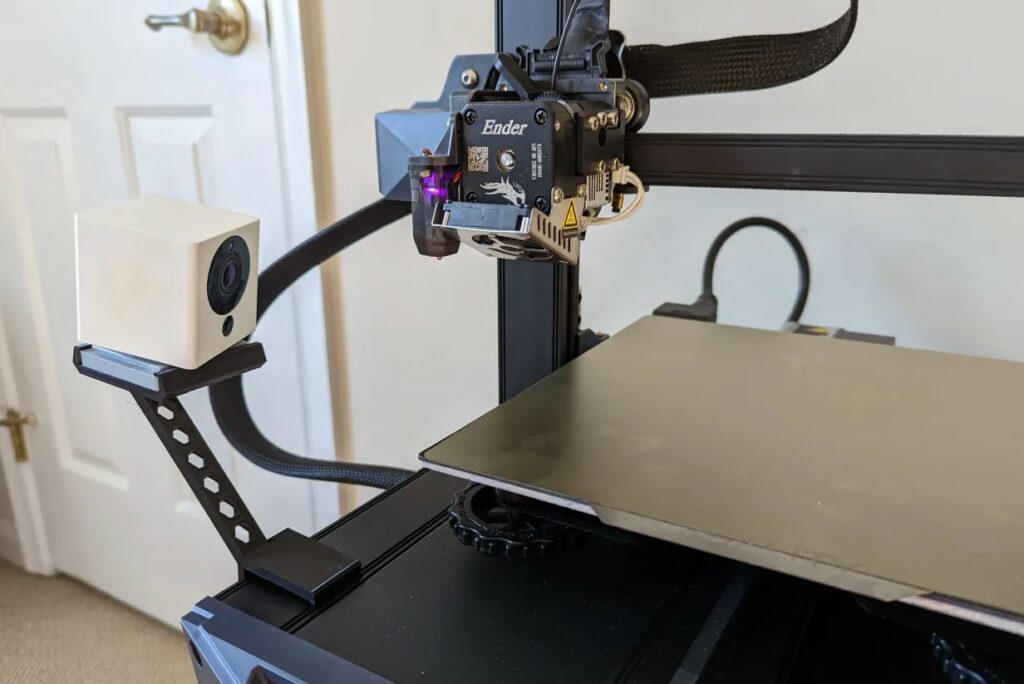
Off to the Side
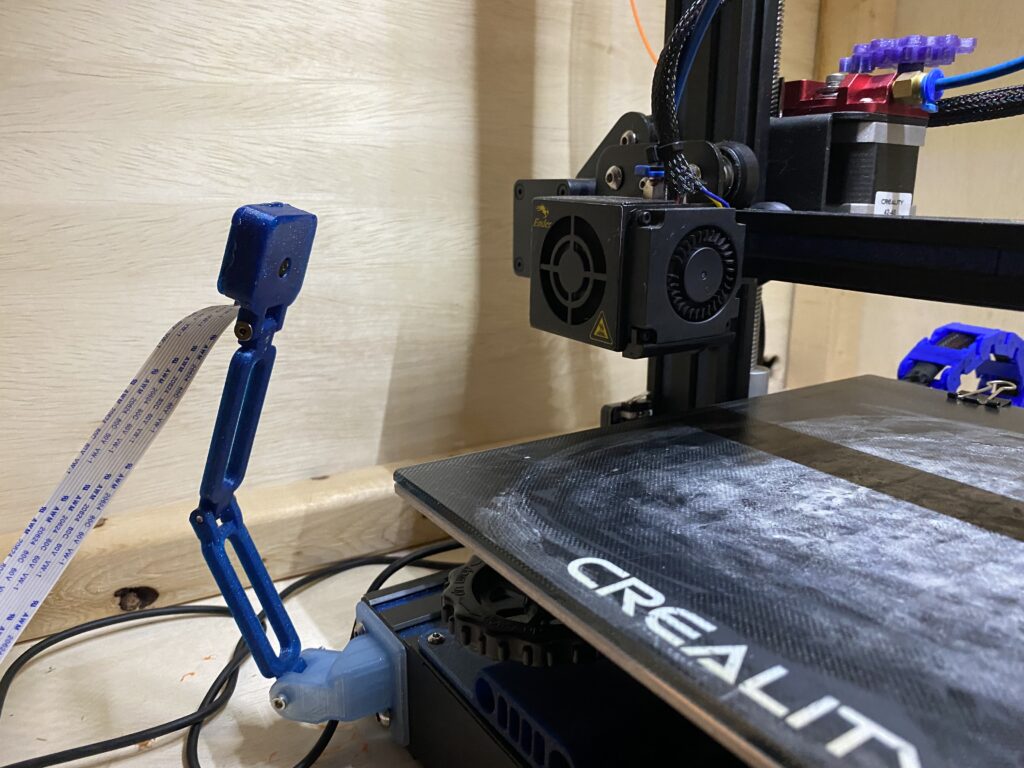
Another mounting position for cameras on the Ender is off to the side, usually in the front-left corner of the machine (assuming you’re facing the printer’s LCD). Most mounts that position the camera off to the side are articulated to an extent, allowing you to adjust the camera’s height and angle based on the size and shape of the model that you’re printing.
This is my personal favorite mounting position, as it’s probably the most versatile. Whether you’re taking a timelapse or using the video feed for monitoring the performance of your printer, setting up the camera off to the side works perfectly!
Other Positions
Besides the three positions we went over, there are also a handful of other places where you can mount your camera. Examples include the following:
- Above the Print Bed:
- Great for special timelapses
- Hard to see each layer in-depth
- Easy to set up
- Attached to the Printhead:
- Makes the printhead heavier (slower print speeds required)
- Difficult to set up
- Great for making videos of filament flowing out of the nozzle
- Useful for checking for under or over-extrusion
- In Front of the Print Bed:
- Great for smooth timelapses
- Not useful for large or tall print jobs
Best Camera Mounts for Ender 3 (Pro/V2/S1)
After you’ve picked out where you want to mount your camera on your Ender 3, you’ll need to find a camera mount that fits on your version of the Ender 3, is compatible with your camera, and matches your desired camera position. Luckily, because the Ender 3 is so popular, there are tons of different camera mounts across different 3D model repositories (e.g. Thingiverse).
I’ve gone over the best camera mounts below, including 3D printable and purchasable options. And for each mount, I’ve gone over the respective camera position, compatible camera, and compatible versions of the Creality Ender 3.
Articulated
ARTICULATED
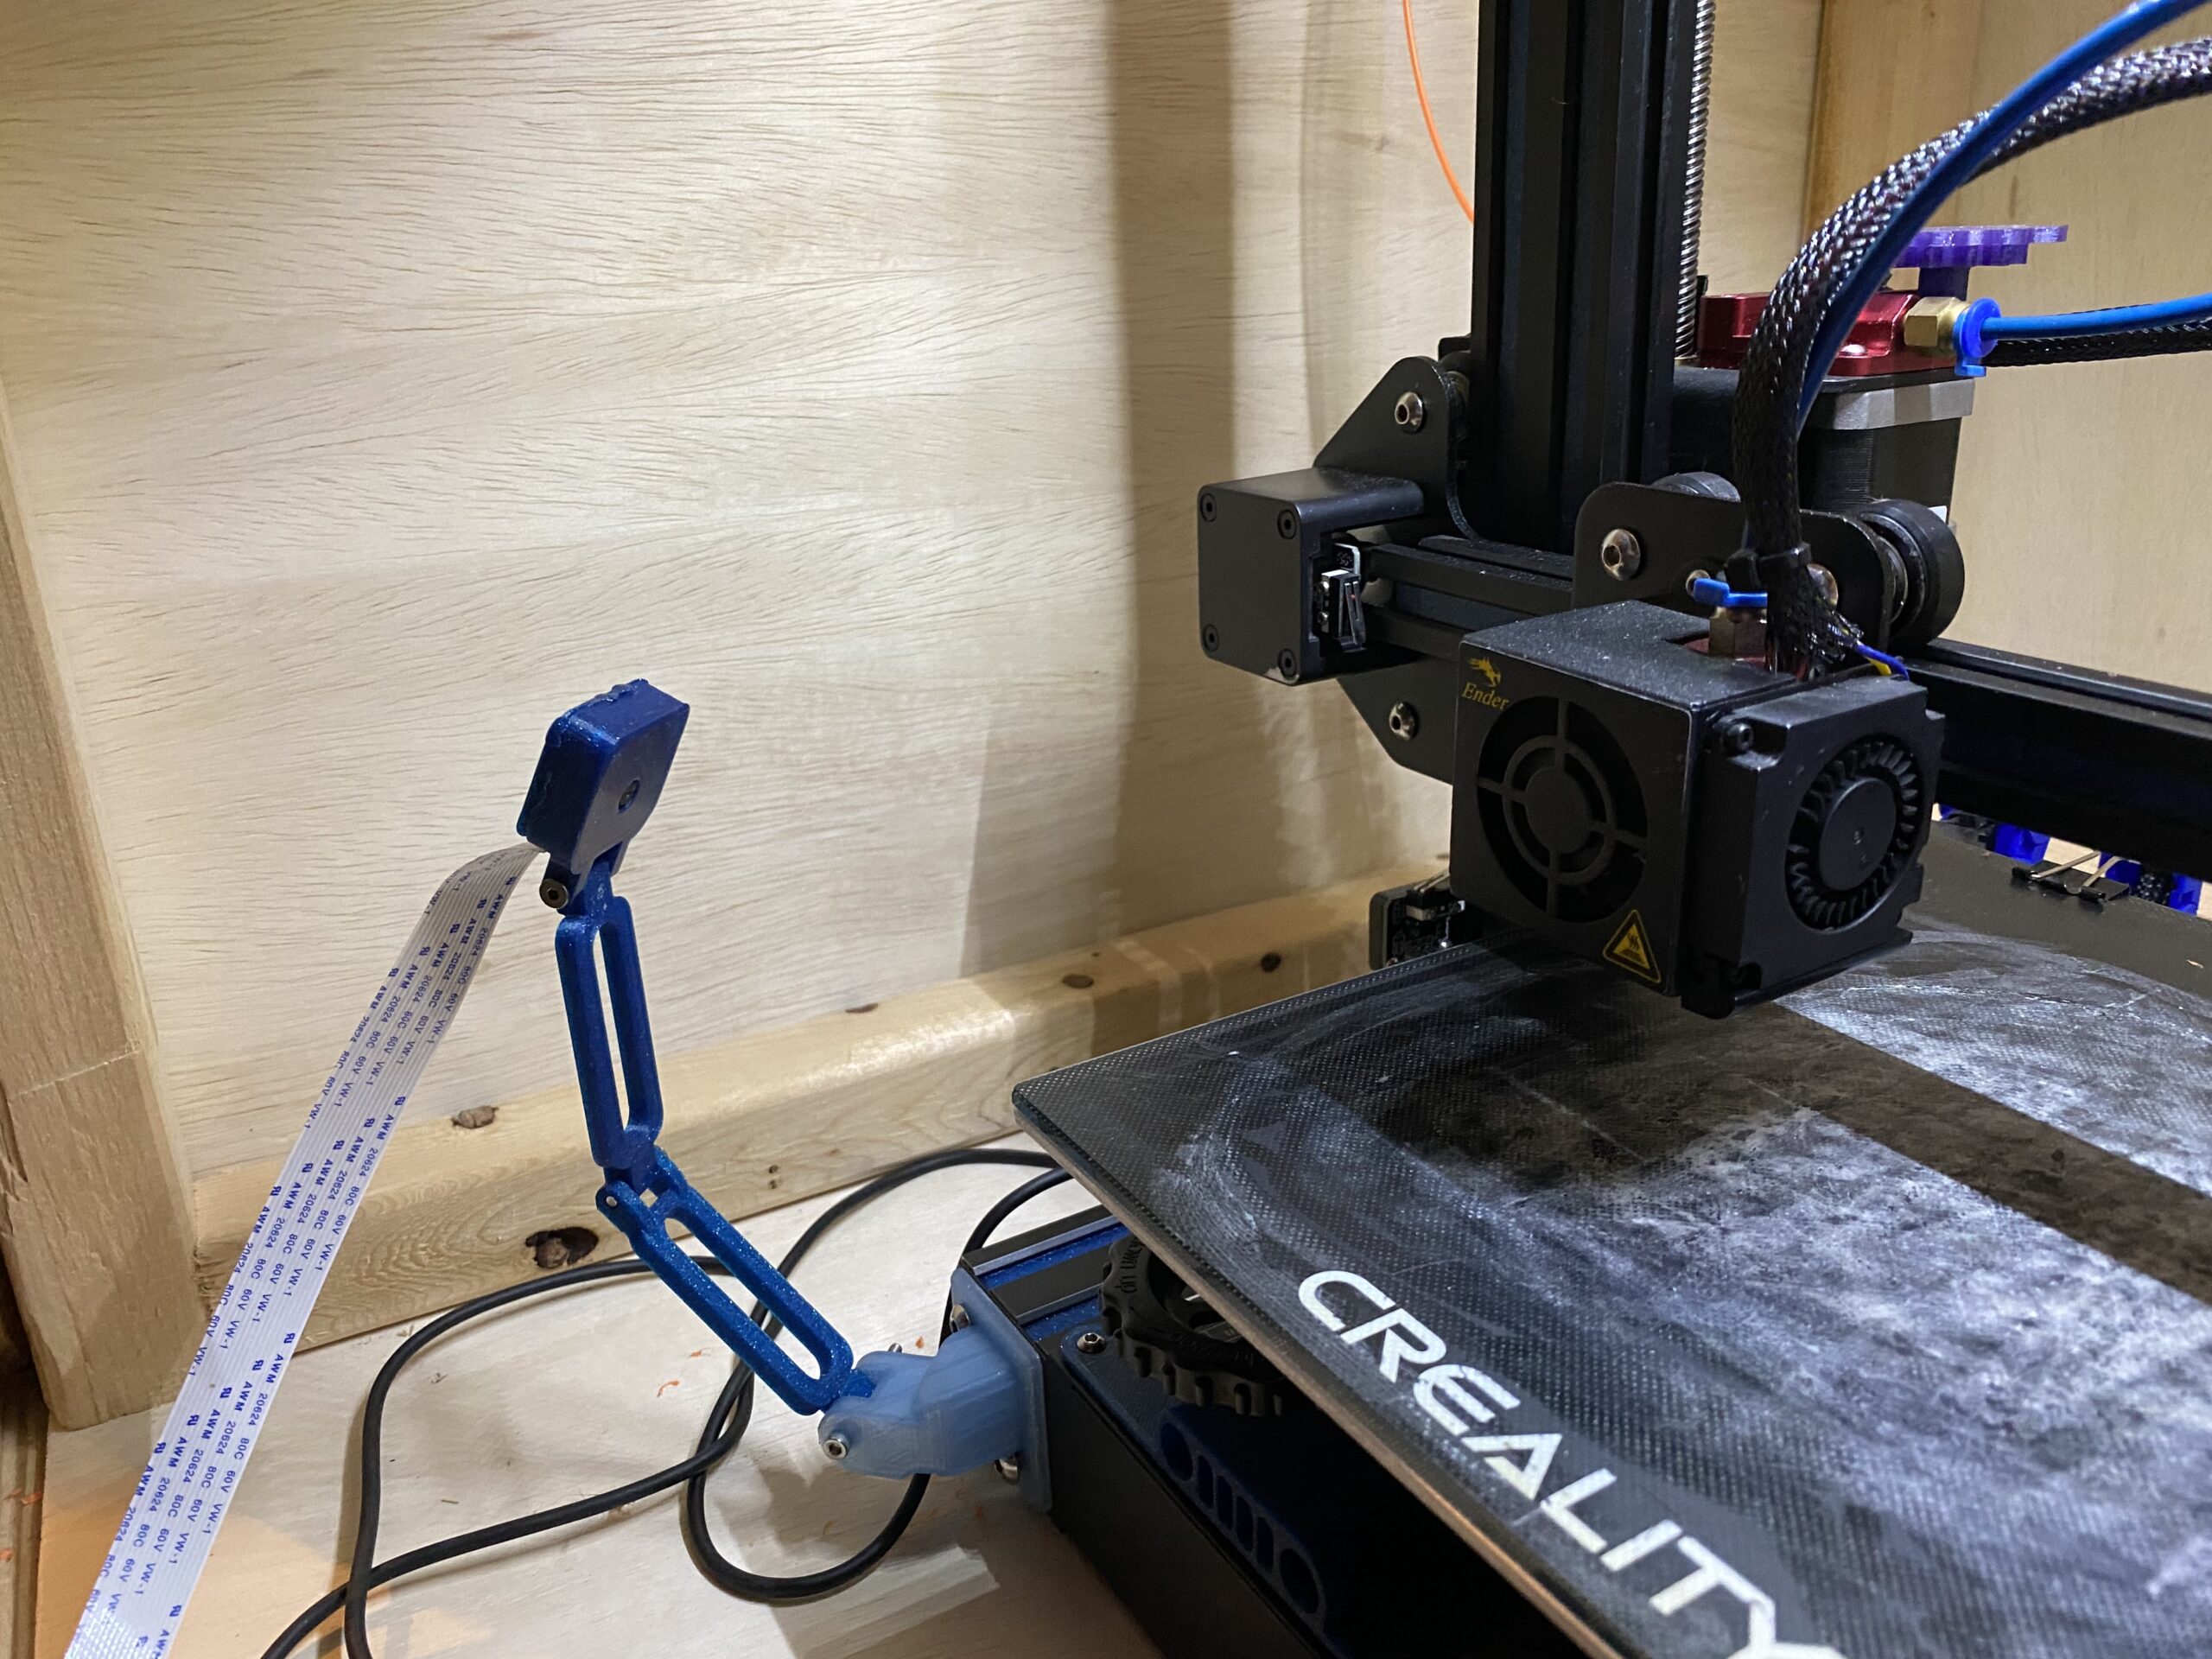
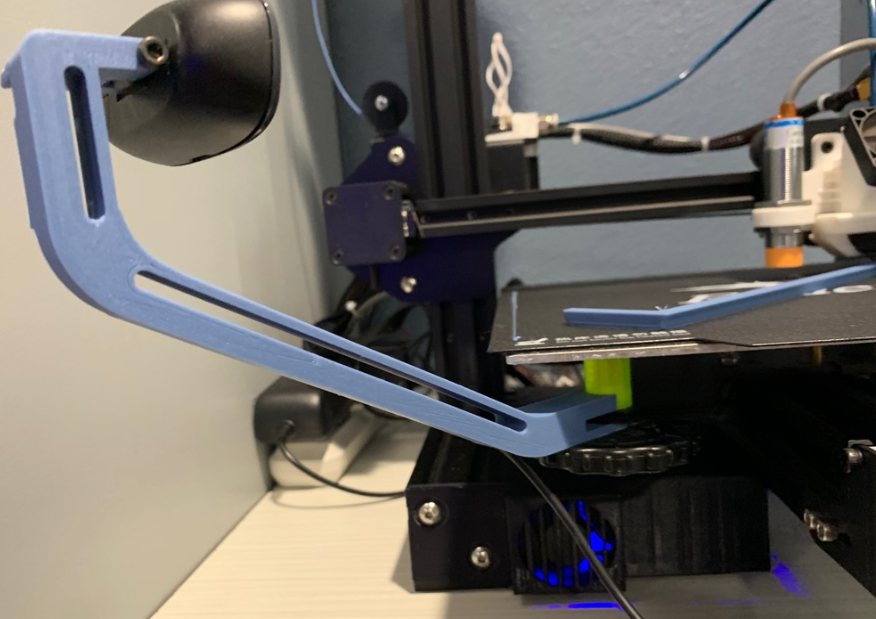
First, this articulated mount is my favorite option and the exact design I use for most of the cameras I use on my collection of Ender 3s.
Compatible versions: Original, Pro, V2, S1The mounting system is made up of five 3D printed parts, which you can print in one go, and requires just a few screws. The mount is meant for Raspberry Pi cameras, but other users have remixed the design to make it compatible with a handful of other cameras, like Logitech webcams.
As for the placement of the camera, this articulated mount is off to the left side of the printer. And the mount is very adjustable, with three joints that allow you to change the camera’s viewing angle and height.
- Mounting position: Off to the side
- Compatible cameras: Raspberry Pi Camera Module V1/V2 (Remixes for other cameras, like the Logitech C270)
Modular
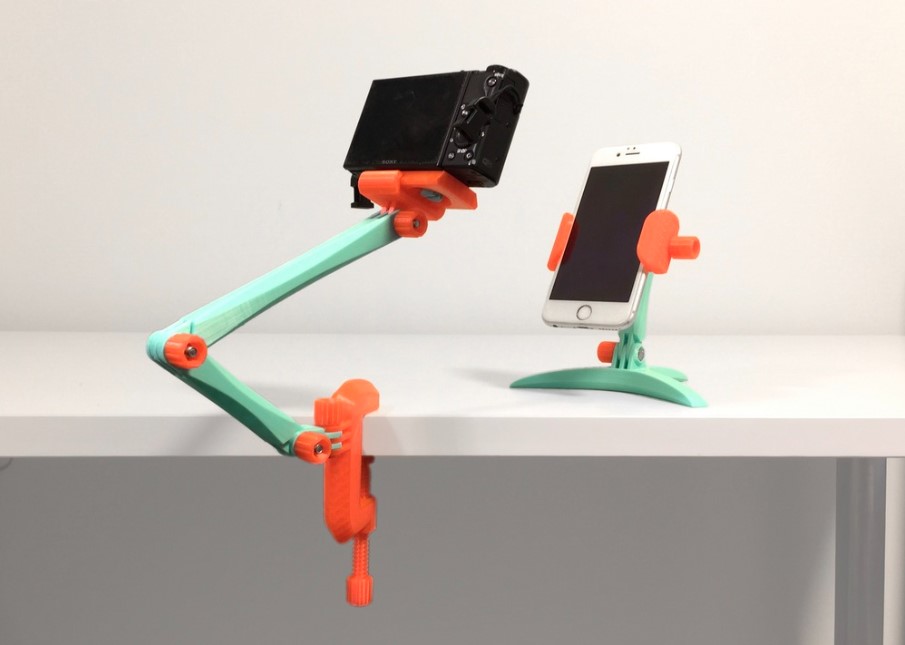
MODULAR
Another easily-adjustable mounting option is this Modular option. This design is super versatile, and while it wasn’t meant for holding a camera for the Ender 3, there are attachments you can download that make the assembly compatible with a handful of different cameras. Furthermore, you can use this mounting system with phones, DSLR cameras, webcams, and more!
And there’s no single configuration of the actual mount, and you can print as many joint arm pieces as you want. The more joints you print, the more adjustable the camera position is!
- Mounting position: Off to the side
- Compatible cameras: Many (check the Remixes section)
- Compatible versions: Original, Pro, V2, S1
Bed Mount
BED MOUNT
Next, this mount places your camera in a fixed position right in front of the Ender 3’s print bed. According to the designer, the bed mount is meant to work with USB webcams, like a Logitech C920, but a Remix of the design features a universal tripod screw mount that you can use to equip other cameras to the mount.
- Mounting position: In front of the print bed, fixed
- Compatible cameras: USB webcams (and standard tripod cameras)
- Compatible versions: Original
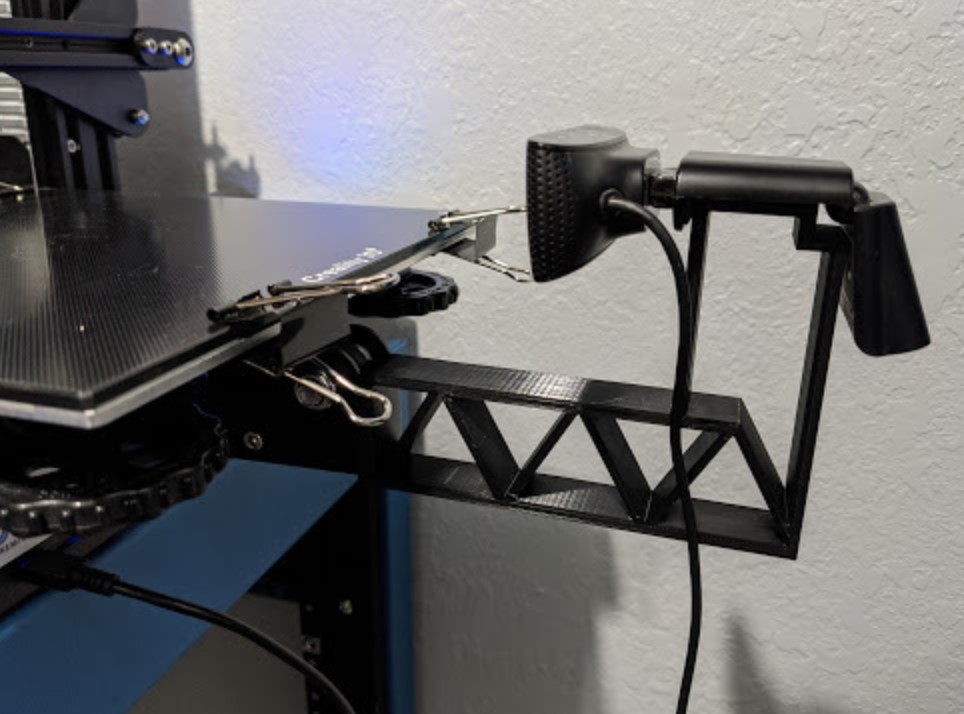
Ball Jointed
BALL JOINTED
If you want to watch your printhead closely at each layer, then this X-axis gantry mount is for you! The mount is meant for a Raspberry Pi camera module and features a ball joint to allow you to adjust the position of the camera to get the most out of your viewing angle.
And attaching the camera mount to your Ender 3’s X-axis is super easy. No screws are needed! It just clips onto the plastic cover over the X-axis motor.
- Mounting position: On the X-axis gantry, to the left side
- Compatible cameras: Raspberry Pi Camera Module V1/V2 (Remixes expand the camera compatibility to USB webcams, too)
- Compatible versions: Original, Pro, V2, S1
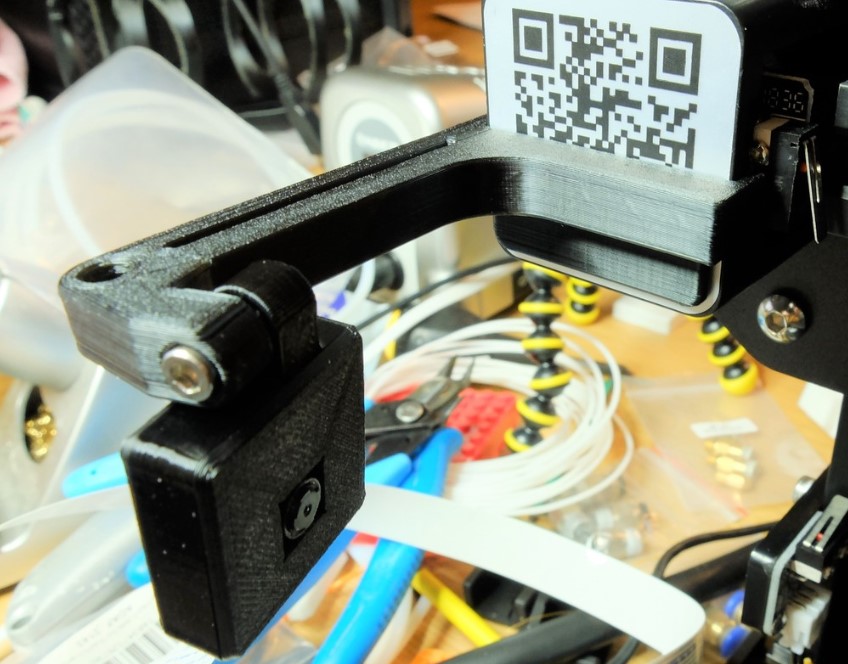
Overhead Bed Mount
OVERHEAD BED MOUNT
Next, this overhead bed mount attaches to the bed leveling screw of your Ender 3 and works with many USB webcams, like the Logitech C270. The mount’s viewing angle is perfect for small and mid-size prints because it places the camera far back enough to watch a majority of the print space but close enough so you can see each layer.
- Mounting position: On the Bed
- Compatible cameras: Logitech C270 (and similar USB webcams)
Compatible versions: Original, Pro, V2, S1
Mini Tripod
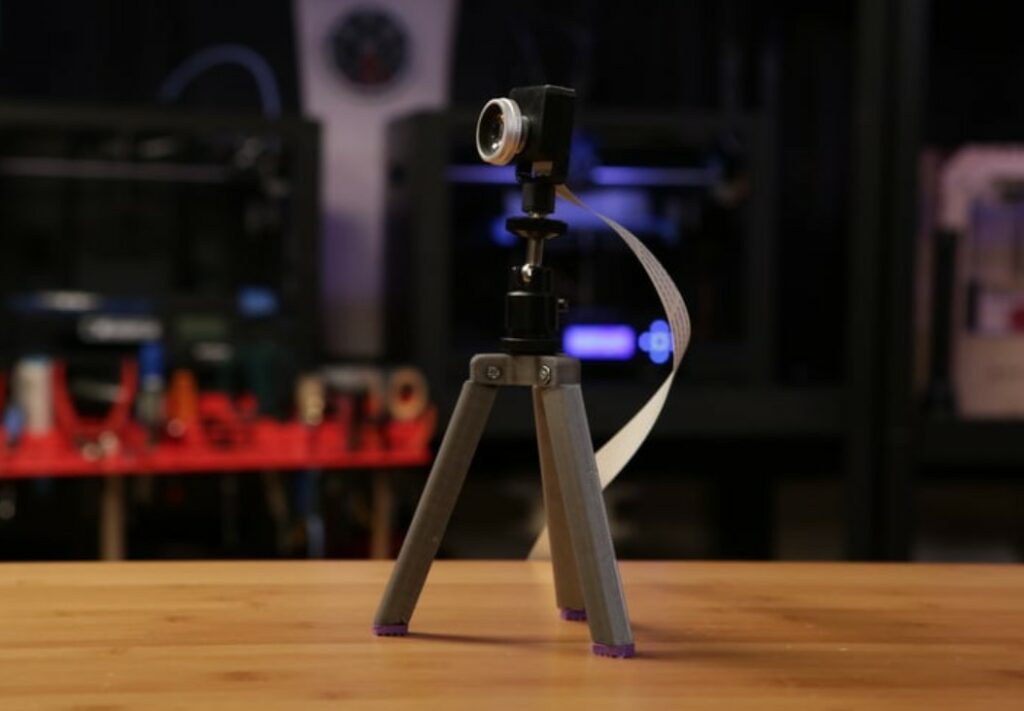
MINI TRIPOD
Lastly, if you’d rather purchase a mount than 3D print one, then you’ll find this mini tripod is for you. The tripod is just a basic tripod with three adjustable feet that make adjusting your camera viewing angle super easy
And the tripod features a standard tripod camera mount (½-inch screw), so you can attach many different cameras. Plus, because this mount doesn’t attach directly to your printer, you can use it with any version of the Ender 3!
- Mounting position: Off to the side (or in front)
- Compatible cameras: Many (any standard tripod camera)
- Compatible versions: Original, Pro, V2, S1
Ready, Set, Action!
Overall, a camera is a terrific and super-useful upgrade for any 3D printer, especially one like the Creality Ender 3 (Pro/V2/S1), which is compatible with a lot of different hardware.
If you’re going to add a camera to your Ender 3, though, make sure you connect it to a server so you can remotely stream the video feed. There are a handful of different options for camera-compatible servers, including OctoPrint (my favorite), the Creality Wi-Fi box, and standalone servers.
Once you’ve configured your camera on your server, then it’s time to mount the camera to set up the best viewing angle of your 3D printer. Mounting the camera off to the side of the print bed is perhaps the most popular option, but you can also place to camera right on the X-axis gantry, attached to the bed, or somewhere else.
And depending on where you want to mount your camera and what camera device you’re using, you’ll have a few options for camera mounts. My favorite is the articulated arm, which positions your camera off to the side of your print bed and offers a fair amount of adjustability. Other options include the modular mount, a ball-jointed system, and more!
Hope this helps!