
Scared of leaving your 3D printer running while you’re not there? Instead of only printing when you’re at home, let artificial intelligence stand guard over your 3D printer for you!
Obico is a 3D printing software that uses artificial intelligence combined with a camera feed of your 3D printer to detect if something has gone wrong. And, if something does go wrong, the software will notify you and, if you want, even pause your print job until you can get back.
No more fretting if your print failed! Plus, Obico can save you tons of filament because print failures are stopped early on in the process!
Want to learn more about Obico and how you can set it up for your printer? Just keep reading!
Table of Contents
What is Obico?
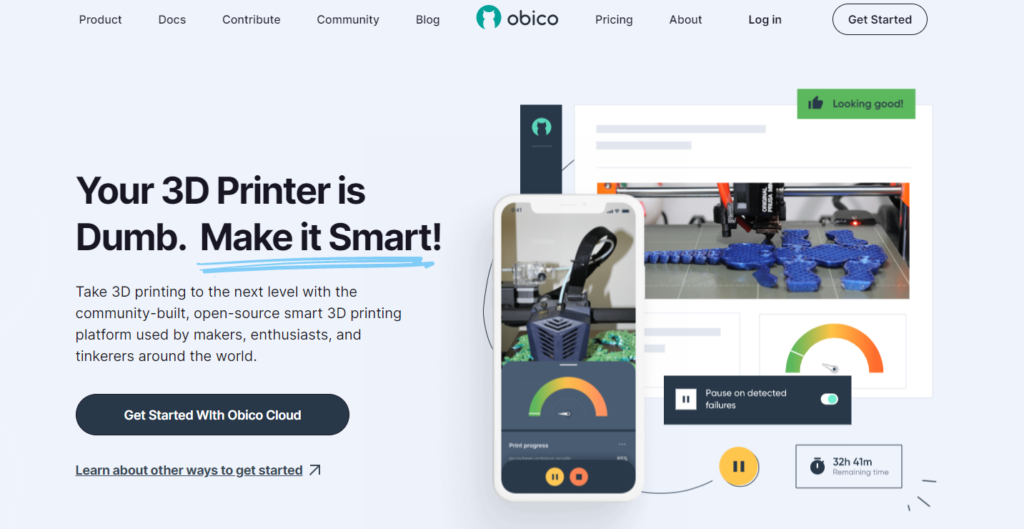
Obico is a powerful 3D printing software that connects to your 3D printer and provides a lot of different useful tools. Obico was originally known as The Spaghetti Detective and came out in 2019. Since its release, the software has significantly expanded in what it can do.
The main feature of Obico is its AI-based print issue detection. We’ll discuss more about this feature later, but, in short, it basically uses the video feed from a connected camera and accurately checks for issues with your 3D print. If it determines that something is wrong, it can even pause (or stop) your print job, so no filament is wasted.
Obico also serves as an alternative online interface to OctoPrint and Klipper variants (e.g. Mainsail). Moreover, on Obico’s desktop or mobile app, you can set temperatures, start prints, make time-lapses, and control other aspects of your printer. Even better is that Obico’s tunneling capabilities make truly remote printer control possible!
Keep reading to learn more about what Obico can do!
How Does Obico Work?
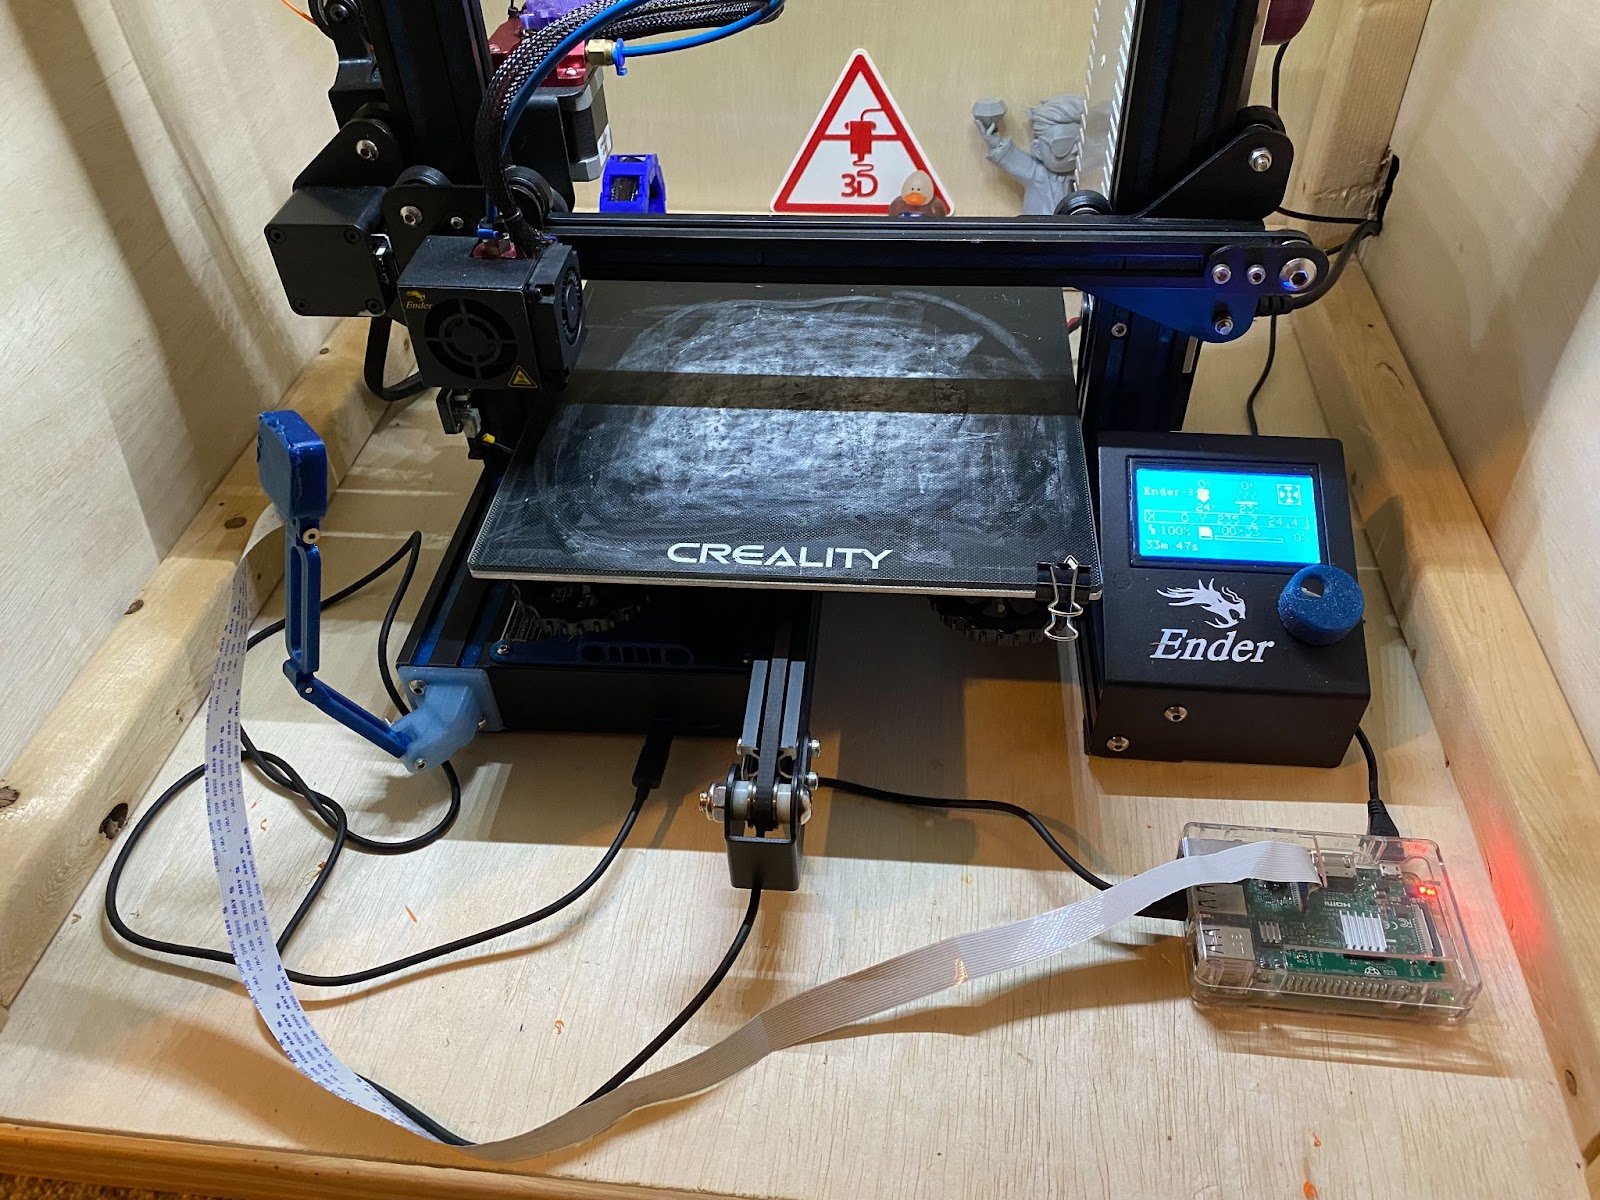
Obico works by connecting to a 3D printer control server, such as OctoPrint or a Klipper server, which connects to your 3D printer.
These servers, usually hosted off of a single-board computer, like a Raspberry Pi board, connect to your 3D printer’s motherboard via USB and send G-code commands to control your 3D printer (temperatures, movement, etc.).
Obico uses API keys to basically use the OctoPrint (or Klipper) server as a medium for its own control features. As such, you can’t use Obico unless you have an OctoPrint, Klipper, or similar 3D printer server setup and connected to your 3D printer.
How Does Print Failure Detection Work?
Additionally, if you want to use Obico’s print failure detection feature, which most people do, then you’ll need to make sure you have a camera connected to your 3D printer control server. This could be a Raspberry Pi camera, Arducam, or a simple USB webcam.
And if you’re wondering how Obico is able to detect print failures, that’s all due to the software’s powerful machine-learning algorithm. Moreover, every time the software watches through the video feed of your 3D printer, it uses image comparison to detect possible printing issues. And after the print, your input on whether Obico got it right or not is used to train the algorithm, making it more and more accurate!
To date, Obico has watched through over 75 million hours of 3D printing, and it’s quickly growing!
Obico Features
As I mentioned, Obico has a handful of different features, and in the sub-sections below, I’ve gone over some of the most important ones.
Print Failure Detection
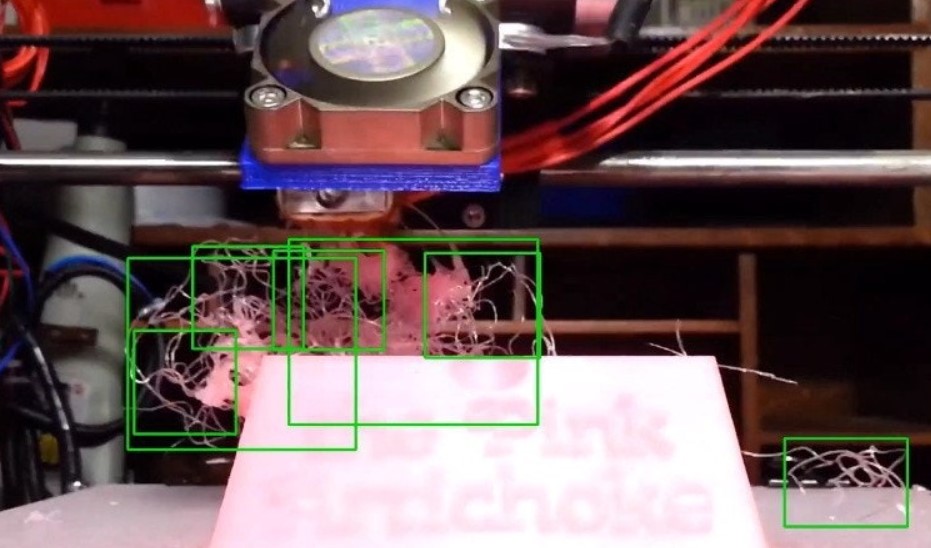
The most appealing feature Obico has is its print issue detection. Furthermore, Obico is able to accurately detect printing issues occurring on your ongoing print job by monitoring the video feed of a camera connected to your 3D printer server.
For example, let’s say I have an OctoPrint server connected to my 3D printer. If I set up a Raspberry Pi Camera Module V2 on the server host computer (e.g. Raspberry Pi 3B+) and position the camera, so it’s facing my print bed, then Obico will monitor the feed and watch for printing issues. If I start to print a model and it begins to warp heavily, then this will be detected by Obico, and the software will either pause or cancel the print job, depending on the configuration settings.
As I mentioned before, Obico’s print issue detection feature is very accurate due to the millions of hours of 3D printing video that it’s been trained with. It can detect all sorts of 3D printing issues, including warping, nozzle clogs, heavy stringing, extrusion issues, and more.
It’s worth mentioning that while Obico is pretty good at detecting severe print quality issues, it’s not super accurate when it comes to smaller issues, such as light stringing or minor gaps in layers. However, you can increase the sensitivity of Obico’s print issue detection in the settings if you want the software to be more scornful of smaller printing issues.
Basic Printer Control
One of the best parts about Obico is that you don’t have to use it alongside OctoPrint’s online interface because Obico’s desktop and mobile interfaces allow you to control many aspects of your printer. For example, you can set temperatures, move the printhead or print bed, and more…you can even create (and download) time-lapses of your 3D prints!
And best of all: you can upload G-code files and start prints straight from Obico’s online interface! It’s also worth pointing out that if you want Obico to watch for print failures, you can’t start the print job locally (from a microSD card); instead, you have to use Obico’s (or OctoPrint’s) online interface.
True Remote Access (Tunneling)
A major downside of OctoPrint is that it’s not truly remote. In fact, you can only access the OctoPrint online interface when the device you’re accessing it on is connected to the same network (Wi-Fi) as the server itself. With Obico, you gain true remote control capabilities, and you can control your printer from anywhere, regardless of network.
This is possible through Obico’s use of network tunneling. This process is a little too complex to talk about in this article, but it basically takes your home-based server and makes it accessible from any network.
The benefit of tunneling is that you can do basically everything you would normally do with OctoPrint’s online interface but on whatever network you want. This means you can start prints from the office, set temperatures while you’re in the car, or use any of the other control features on Obico’s interface without being on the server’s home network!
Improved Desktop Interface
One of the best parts about Obico is its visually appealing and well-laid-out web app interface, which beats the rather dull OctoPrint online interface by a landslide. Moreover, Obico’s web app interface follows a dark theme that everyone seems to love nowadays.
And all of the control features, like temperature adjustments and printhead motion, are all easy-to-find and easy to use. You don’t have to be knowledgeable in 3D printing at all to navigate and use this interface!
Mobile App

Lastly, Obico has a mobile app, which is absolutely amazing. Similar to the Obico desktop site, Obico’s mobile app has a very well-built interface, which is something not a lot of 3D printer mobile apps have. This makes using Obico on a phone or tablet a breeze, and you’re not restricted at all in what you can do when using Obico on your phone versus on a computer.
How to Set Up Obico?
Setting up Obico is super easy, and in this section, I’ll be going over the steps for setting up Obico on an OctoPrint server. The process is also very similar if you’re using a Klipper server with a non-OctoPrint interface, such as Fluidd or Mainsail, and more instructions for these configurations can be found on the Obico website.
Before we get into the step-by-step instructions, it’s important to mention that you’re not technically making an Obico server. Instead, you’re connecting Obico to an existing server, such as an OctoPrint server. As such, make sure that you’ve got your OctoPrint server set up properly, with adequate power to the host computer, a connection to your printer’s motherboard, and stable internet.
If you’ve got that covered, then you’re good to go!
- On your computer (e.g. laptop, PC), open a web browser and go to your OctoPrint online interface. Remember that you can access the interface by typing the IP address of the server’s host computer as the URL in your web browser.
- Click the wrench icon in the top-right corner of the OctoPrint online interface.
- Select “Plugin manager” from the list of options to the left.
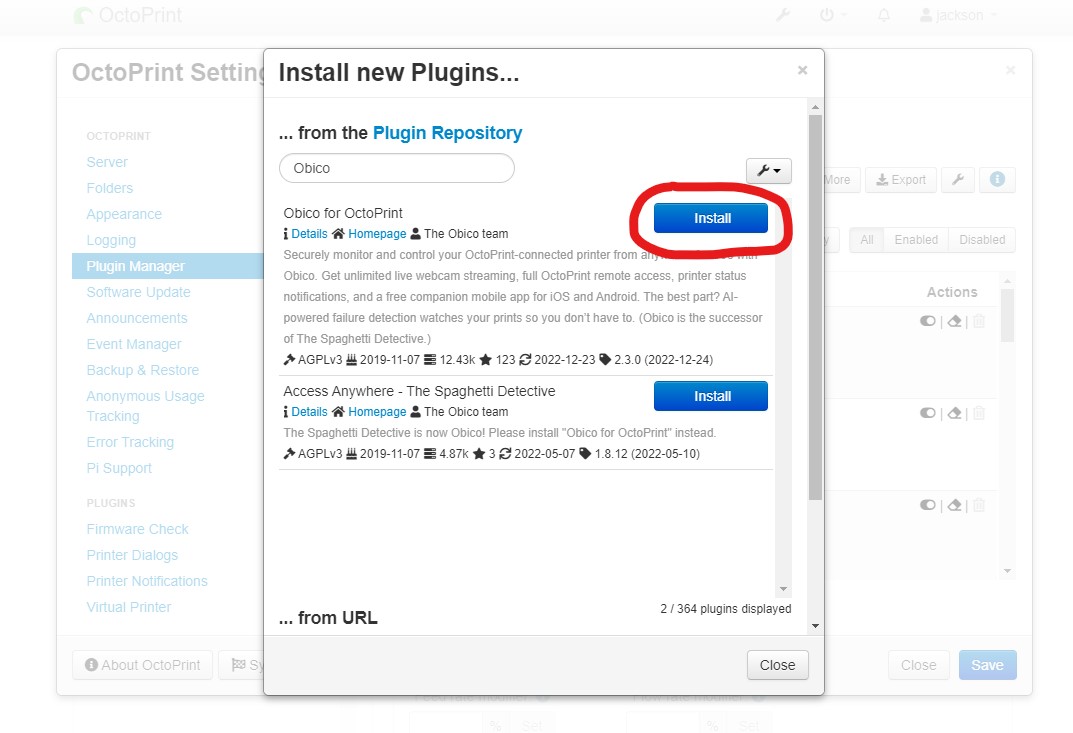
- Click the “Get More” option near the top-right corner.
- Search for “Obico” and click the first option. It should be titled “Obico for OctoPrint”. This Obico plugin makes setting up your Obico server very easy.
- Click “Install” to add the Obico plugin to your server.
- Wait for the pop-up dialogue box to say “Done!” and then, when prompted, reboot your OctoPrint server for the Obico plug-in to be loaded.
- A minute or two after rebooting your OctoPrint server, refresh your OctoPrint online interface by clicking Ctrl+R on your keyboard.
- When the interface is reloaded, a pop-up box for the Obico plug-in should appear.
- Click “Next” and, on the second step, choose “Web Setup”.
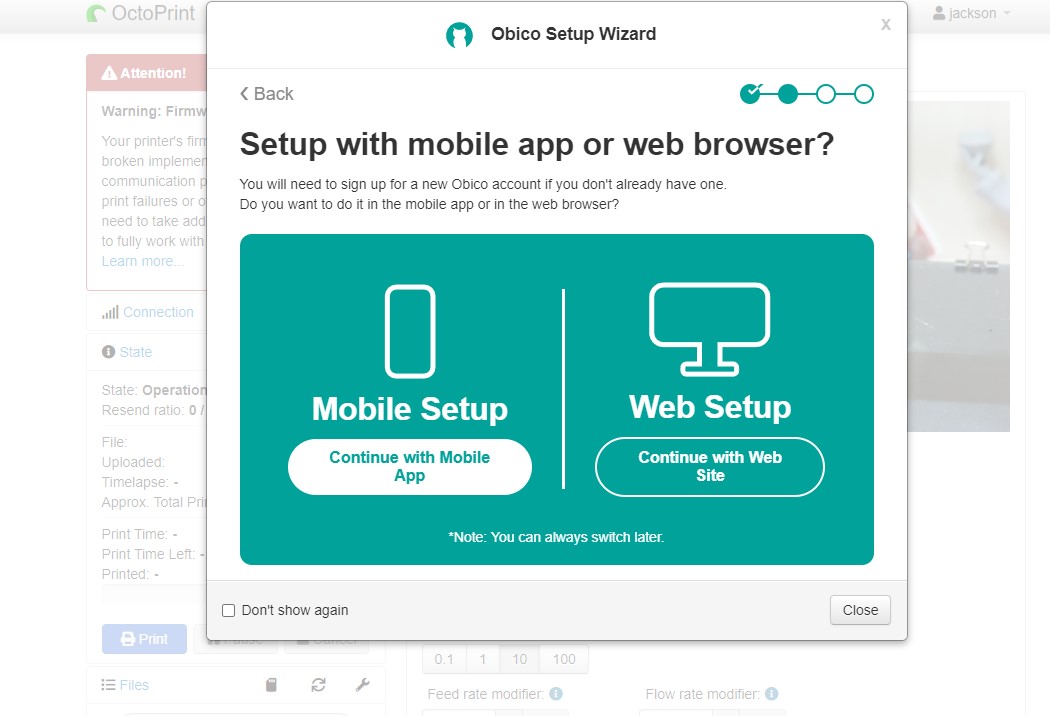
- Open up a new tab on your web browser and go to Obico.io.
- Click “Log in”, and if you don’t have an account, create one.
- Once logged in to Obico, go to the “Printers” tab on the Obico app page.
- Click “Link New Printer”, and select “OctoPrint”. Of course, if you’re using a Klipper server, you would click “Klipper”.
- Click “Next”, and Obico will automatically scan for an OctoPrint server to connect to.
- Once found, you will be prompted to enter a six-digit code. Go back to your OctoPrint online interface tab on your web browser, where the code should have appeared.
- Copy and paste the code from the OctoPrint online interface to the Obico tab.
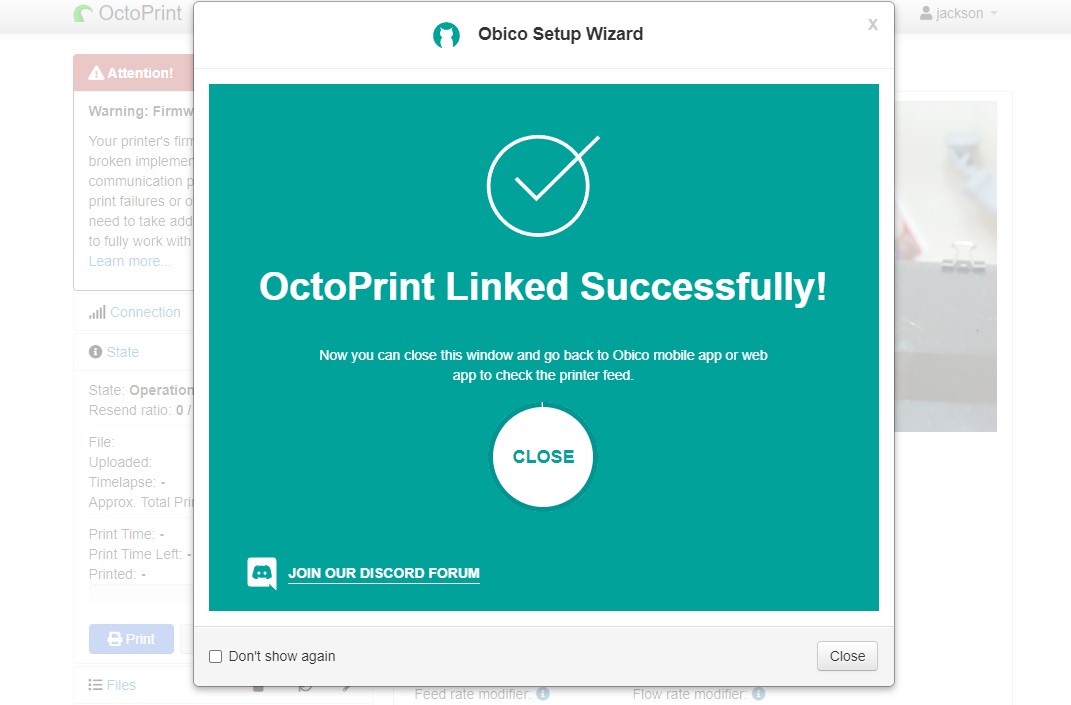
And that’s it! You’ve now successfully connected your 3D printer (and OctoPrint server) to Obico, and you can start using the program!
Advantages and Disadvantages of Obico
Need to make a quick decision on whether to get Obico or not? Well, below, I’ve I’ve gone over the advantages and disadvantages of this software to help you out:
Advantages:
- Very accurate print failure detection
- Built-in printer control (e.g. temperature, movement, etc.)
- Automated time-lapses
- True remote printer control through tunneling
- Easy setup process
- Well-built and easy-to-use desktop and mobile interface
- Capable of connecting to multiple 3D printers
Disadvantages:
- Can’t upload G-code files with free version
- Limited tunneling and webcam viewing with free version
- Can only connect to one printer with free version
- No plug-ins or additional features, like with OctoPrint online interface
Free VS Paid Version
While most of Obico’s features are free, not all of them are, and there is a paid, “pro” version of the software. In this section, I’ll review the differences between the free and pro plan, so you can make the right decision about which one is best for your 3D printing needs.
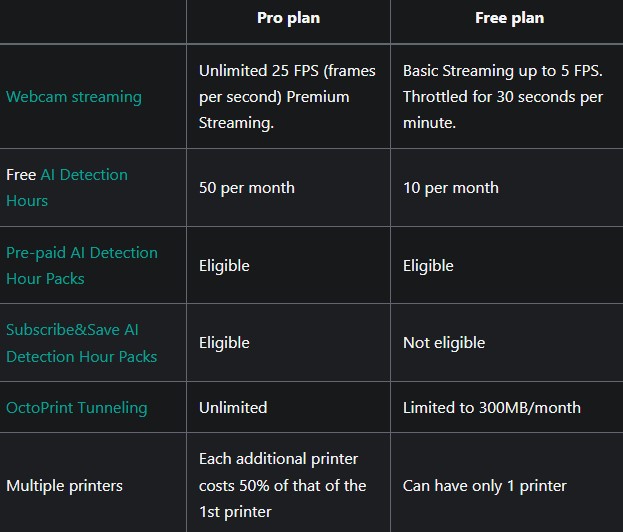
First off, let’s talk price! The Obico Pro plan currently costs $4 per month (billed as $48 annually), while the Free plan is…of course…free. With the standard Pro plan, you can connect Obico with up to two 3D printers, and you can add additional machines to the plan for an extra $2 per month (each). As such, one of the most popular reasons people consider Obico is for controlling many printers on a smart 3D printing platform.
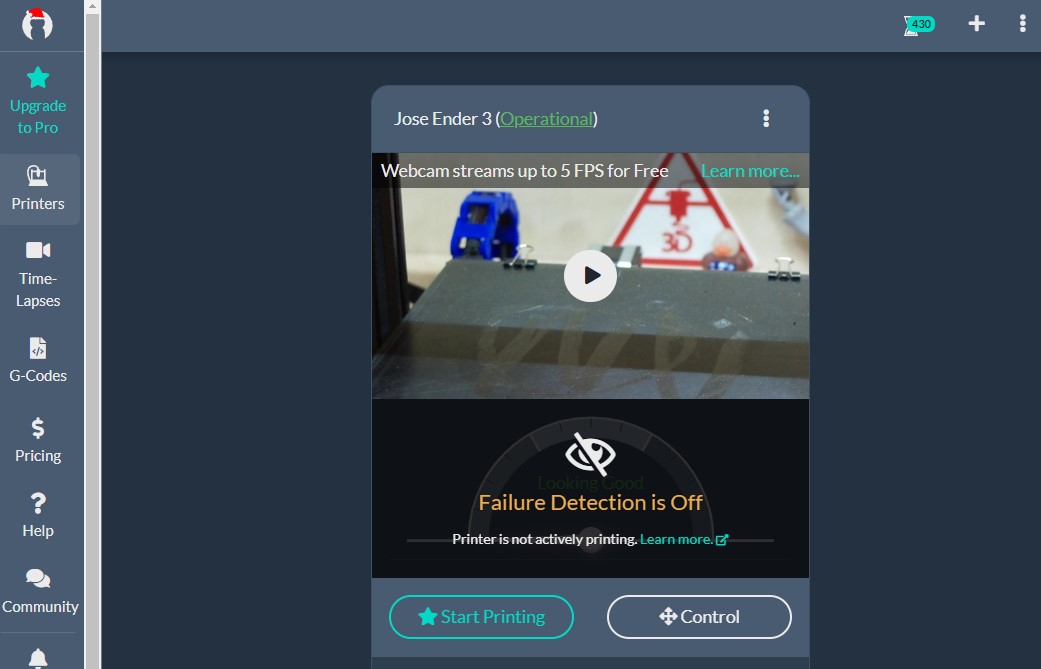
But the Obico Pro plan also offers a handful of other benefits that you don’t get in the Free plan. For example, the webcam feed on Obico’s platform is limited to 5 fps (with throttling), but the Pro plan enables 25 fps camera streaming.
Additionally, the tunneling capabilities of Obico are capped at 300MB per month with the free plan but are unlimited with the Pro plan. The data tunneling cap with the free version limits how much you can use Obico and how much data (e.g. G-code files) you can send through the platform (to your 3D printer). With this in mind, the Pro plan is the better option for people looking to use Obico’s platform a lot to upload print jobs, stream the camera feed, and use other tools.
But I think the biggest difference between the Free and Pro plan of Obico is the number of AI detection hours. Moreover, Obico limits how many hours of active 3D printing the software’s AI print failure detection program watches. That’s because watching prints takes computing energy on Obico’s end, and this costs some money.
With the Free plan, you get 10 AI detection hours per month, but the Pro plan gives you 50 hours per month. So, if you use your 3D printer a lot and want Obico to always be watching for print failures, then you’ll want the Pro plan. Keep in mind, though, that even with the Free version of Obico, you can make one-time purchases for additional AI detection hours.
Conclusion
Obico is one of the most innovative and useful 3D printing software programs of this time, and it’s the perfect product for anyone who loves 3D printing but worries about print failures. Obico’s AI-enabled and very accurate print detection algorithm gives you peace of mind when printing models, even when you’re not watching your printer.
But Obico also has a bunch of other neat features. Its tunneling capabilities are super useful for monitoring prints and controlling your 3D printer when you’re not at home. On this note, the platform also allows you to perform many different actions on your printer remotely, such as starting points, making timelapses, setting temperatures, moving the printhead, and more!
I highly suggest getting Obico if you already have an OctoPrint or Klipper server set up and connected to your 3D printer. But, even if you don’t already have a 3D printing server, which Obico requires to run, then you should consider building one as Obico is 100% worth the cost.
And, if you have a couple of 3D printers or want the most out of Obico, then you might want to look at the Obico Pro plan. While it costs money, it’s very affordable and gives you some extra features that don’t come with the Free plan.
Related Articles: