Why is everyone talking about this 3d printing thing? What is 3d printing? It’s an insanely cool technology that’s easy to understand and use. It’s no wonder so many people are in love with 3d printing – myself included.
I’d like to teach you about 3d printing in this ultimate guide. We’ll look at types of 3d printing, some history, and then answer your question of what 3d printing is with some good detail and examples.
Afterward, we’ll learn about what 3d printing can do for you, and who should have a 3d printer. I’ll compare 3d printing to other alternative processes. Finally, we’ll take a peek at the pros and cons of 3d printing, and how much it might cost if you’re interested. We have a lot to cover. Let’s get started.
Types of 3D Printing
There are eight different types of 3d printing. For each one, the concept is the same, but the execution is a little different. They were each invented to perform well in a particular application. Each one has its pros and cons. Consumers use very few of them because of these pros and cons.
The different methods are FDM, SLA, SLS, DLP, MJF, PolyJet, DMLS, and EMB. The three biggest methods for consumers are FDM, SLA, and DLP.
SLS 3D Printing
SLS stands for Selective Laser Sintering, which is obviously Dr. Evil’s favorite type of 3d printing. It melts together nylon dust and makes solid pieces out of it. The parts are more expensive and more durable than others. This technology is very commonly used to make parts that will later be mass-produced using injection-molding machines.
MJF 3D Printing
Multi Jet Fusion is another technology that starts out using nylon powder. Instead of lasers, MJF printers use fusing agents and heat. Since it doesn’t use lasers, the final product is more predictable and consistent. It also boasts a better surface finish.
Due to how the fusing agents are arranged, it expedites the process as well. It’s also less expensive compared to SLS. It’s used for the same reasons as SLS, for making parts that will be mass-produced using injection-molding machines.
PolyJet 3D Printing
PolyJet is sort of like 3d printing on steroids. It lets you change the material type and color of your parts. This is a great technology for people prototyping for mass production. It’s especially useful in the molding and injection-molding world.
It saves you money and time associated with tooling during the early prototyping stages. This means you can get the next-gen prototype out quicker and cheaper, and your future iterations have the same benefits.
DMLS 3D Printing
DMLS is a metal 3d printing technology. It stands for Direct Metal Laser Sintering, and it sinters metal directly using lasers. People in the 3d printing world are super creative. It uses lasers to melt metal powder just like SLS does for nylon powder.
People use DMLS for one-off or low-run metal parts. You can also simplify a whole metal assembly into a single metal 3d printed part. This is the closest thing to the replacement of a machine shop via 3d printing.
EMB 3D Printing
EMB is another metal 3d printing technology. It stands for Electron Beam Melting and you won’t guess what it uses to melt the metal powder. An electron beam! The beam is controlled by electromagnetic coils in the machine that lead to a super-focused electron beam.
You need a perfect vacuum for this technology to work otherwise all of your prints will look like expressionist art. The addition of a vacuum and magnets makes this technology more accurate, but also more expensive than DMLS. It’s used for the same applications as DMLS; making metal prototypes, one-off pieces, and low-run parts.
SLA and DLP 3D Printing
SLA and DLP methods use a resin bath, a laser or fancy light, and some science to make a part. They’re more expensive and create more durable pieces with much more accuracy. There are a lot of viable applications for these two methods, even in consumer markets.
SLA and DLP printers are used to make custom jewelry, in the medical world to make anatomical models and testing a part’s fit in an assembly.
FDM 3D Printing
The people’s champ is FDM printing. This is the type of 3d printer that most people are referring to when they talk about or think about 3d printing. FDM stands for Fused Deposition Modeling. It’s the most commonly used style of printing for consumers, and there are many reasons why.
For this article, we’re going to be looking solely at FDM printing because it’s the preferred method for a vast majority of users. In fact, in 2019, 86% of all FDM printers used were used for household purposes. We’ll learn about the history of FDM, and then get into how they work. Keep on reading for more info.
History of 3D Printing
So if I were to make a bet, you’ve probably first heard about this technology within the past ten years. It all started in the 70s with a gent named David E H Jones spelling out what 3d printing is. He had a column in a science magazine. He wrote the conceptual stuff that goes into 3d printing that we know today.
In ’81, a Japanese man named Hideo Kodama invented two different methods for 3d printing. Within a few years, the first patent was granted for 3d printing. Over the next 39 years, the technologies would keep advancing.
- 1988 – First SLA printer
- 1992 – Stratasys gets FDM patent
- 2004 – Open-source FDM printer is invented
- 2009 – FDM patent becomes public
- 2009 – First commercial FDM printer is sold
- 2016 – FDM printer under $300 is unveiled
But if you look at the timeline, the past ten years are where most of the significant strides were made.
3d printing stores open, the media catches wind of the technology, hype grows for 3d printing, and a range of consumer 3d printers are unveiled and sold. Today, anyone can have a 3d printer in their house with no training required. This history is akin to computers. Once we realized their potential, they got a huge push forward and attacked the commercial sphere.
FDM printers weren’t even the first type of 3d printers made. The reason they’re so successful nowadays is because of how the printers work, how affordable 3d printers are to use, and how easy they are to operate.
What is 3D printing?
The question on everyone’s mind. What is it? In my opinion, it’s where art meets engineering. 3d printing is when a machine takes the idea from your screen and makes it in real life. It opens the doors to design. 3d printers allow for almost anything to be designed and printed.
What are the fundamentals of 3d printing? Adding material on top of each other until you have a final product. Stay with me here. Let’s talk about some terms you need to know, and then we can dive into the intricacies of how 3d printing works.
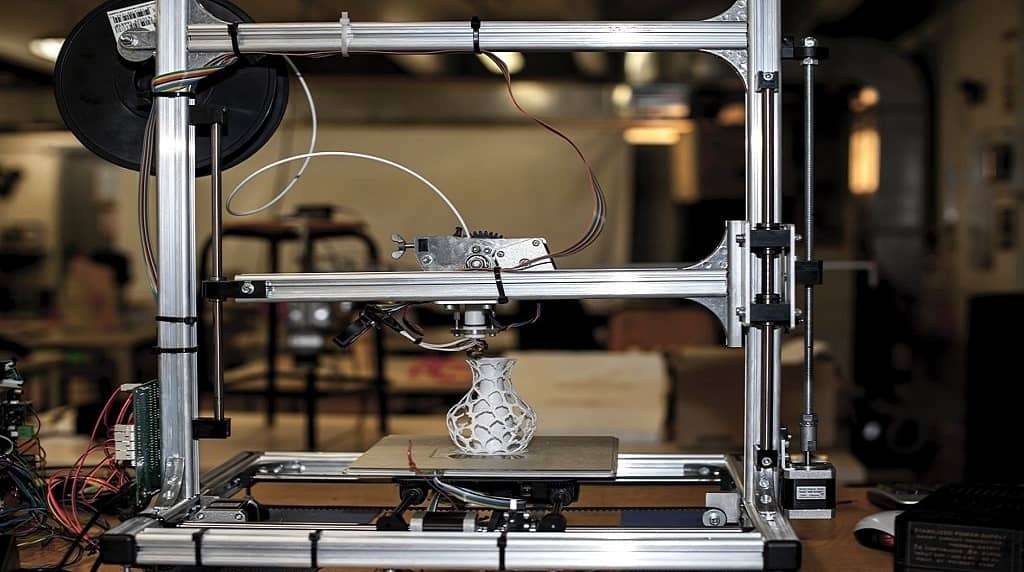
Parts of a 3D Printer: Introduction
Before we dive into how the process works, let’s learn some quick definitions. We’ll revisit these parts in detail after learning how a 3d printer works. You might think that a 3d printer is an intricate machine with a million parts. Well, it’s a lot simpler than that. There aren’t a ton of parts, and there are even fewer parts you need to know.
You’ll notice that the people who named the parts of the 3d printer were very creative with their names. We start with a filament spool. The filament is the material used in your printer. The filament spool is the roll of material that feeds into your printer.
The extrusion head is the whole assembly where the extrusion happens. This is where all the magic occurs. It’s the black box where solid material comes in and gooey melted material goes out. The extruder assembly has a mini cooling fan. Just like what’s on your computer tower, but smaller.
The hot end is the guy that gets super-hot and melts the filament as it comes out, making it gooey. The build plate is where the machine builds the print. So what does the full process look like for 3d printing?
From Design to 3D Print
The process before hitting “go” on your printer is what will take most of your energy. The good news is the process is super easy. The entire 3d printing process looks like this:
- 3d model your part
- Export your modeled part to an .STL
- Import .STL into slicer
- Export .gcode from slicer
- Import .gcode into 3d printer and click “go”.
- Wait for the print to finish. Now you have your finished 3d printed part!
After a few 3d prints, this process becomes way faster than you’d think. Steps 2 through 5 will take an experienced 3d printer for less than 5 minutes. Let’s learn more about each step.
3D Model Your Part
If you don’t have 3d CADD experience (like SolidWorks, Inventor, Creo, or AutoCAD), it’s not a problem. In fact, most of my friends who 3d print have no 3d CADD experience. There’s a whole online world of friendly people who love 3d printing and love sharing their creations with others.
There are great sites like GrabCAD, Pinshape, and Thingiverse. On these sites, 3d designers will upload files that they designed to 3d print. We have access to take these uploaded files and use them for ourselves! For free! We can download the .STL file directly from the site, skipping steps 1 and 2 in our list.
What is an .STL file?
An .STL file is a smart file extension. It converts your complex 3d model into a ton of triangles, simplifying it dramatically. This means that your file turns into a mesh that slicer software can understand and use. .STL stands for “stereolithography”. People also say that it stands for “Standard Triangle Language” or “Standard Tessellation Language”.
What is Slicer?
Like the name suggests a slicer slices. More specifically, it cuts the part you want to 3d print into a ton of stackable pieces. Some of the top slicer software is Slic3r, Cura, and Repetier. You use a slicer to input almost all of your 3d printing parameters and settings.
You’ll decide how much accuracy you want to print with, the position of the 3d printed piece, you can scale the piece to be bigger or smaller, decide how to orient the piece, pick what type of filament you’ll use, and how to stick the part to the build plate.
The slicer is the boss. It makes all the decisions. The 3d printer just reads what the slicer tells it to do, and then does it. When you make all the decisions on your slicer software, you’ll export it as a .gcode file.
What is .gcode?
.gcode is the language that machines understand. You can open a .gcode file on the Notebook program on your computer. It’s tons of lines of random-looking alpha-numeric sequences. If you understand how to read .gcode you’ll realize it’s not random at all. It’s actually very intricate steps and sequences.
It tells the machine what to do, when to do it, and in what order to do things. In our case, it tells our 3d printer exactly what it needs to do. The .gcode has all of the information about motion and laying filament.
The 3d printer will blindly follow the .gcode without thinking. Now that we know the process, we should figure out how 3d printing works.
How Does 3D Printing Work?
If you’ve ever played one of those claw games at an arcade, you know precisely how a 3d printer works. No, it doesn’t steal your money, and it’s not rigged, but everything else is the same. The joystick moves the claw left and right, and depressing a button drops the claw straight down.
Now let’s take the claw off and put on an extrusion head. Instead of putting in quarters to run the machine, let’s feed in a filament spool. Now we have a 3d printer! 3d printers use a simple-to-understand process to build each part. The filament goes into the extrusion head, heats up, gets pushed out of the hot end, and builds on the build plate.
There are little motors that move the head of the printer in the x, y, and z directions. There’s another small motor that forces the filament through the hot end. It builds one layer at a time, then steps up a little bit. It starts by printing directly on the build plate, and it will make the entire first layer.
After the first layer, the head of the printer moves up a tiny bit and builds the second layer right on the first layer. The many ways to explain it is the machine builds in the XY plane before stepping up in the z-direction. If you watch a time-lapse of a 3d print, you’d see the machine dance around before moving up a little. Over time the part gets taller.
For example, let’s pretend you’re 3d printing a tiny flagpole standing straight up. The printer’s first layer is a circle that it fills in. Then the head moves up a little bit and prints the second layer. The second layer is just a ring along the outside. It’s not filled in. The next many layers are this same ring. Each ring, the printer moves up a little and prints again. Our flagpole is getting taller.
It continues making this same shape until it’s at the top of the flagpole and prints a circle that’s filled in. This same process is done for anything that’s 3d printed. One layer is built in the XY plane, then the machine’s head moves up a little bit and prints the next layer, and continues this cycle. Now you know how a 3d printer works- let’s take a look at the material we feed into our printer.
Filament Materials in 3D printing
This is another essential feature of 3d printing. In general 3d printing, there are over 100 material options to print with. For household and commercial 3d printers, there are tens of plastics options. Recall that this filament gets fed through the extruder block and pushed through the hot end of your printer. The limiting factor is how hot your hot end can get. The higher temperature the hot end can reach, the more materials you can print with.
Common materials to 3d print are ABS, PLA, Nylon 6-6, and PBA. For professional-grade printers, they can venture into the world of metals. You can 3d print aluminum, stainless steel, and titanium in a very similar method that you would print plastic.
Beyond that, there are biomaterials, ceramics, and types of paper you can print for specific fields. There are so many different materials that people optimized for 3d printing. Therefore, there are so many various applications you can use a 3d printer for. I’ll commission an infographic table for the materials above and a short description which would go well with this section
Applications of 3D Printing
The simple answer is; if you need to make stuff you need a 3d printer. Any manufacturing process can be replaced either entirely or partially with 3d printing (as long as you’re not making products in bulk). There are a few prevalent uses for 3d printing.
Engineers Using 3D Printers
The most prominent use is in engineering purposes for prototyping. Rather than shipping the drawings to a machine shop, they’ll print them in-house and make changes.
3D Printing “Machine Shops”
I’ve worked with guys who had shops full of industrial 3d printers. The farm work all day and work as a manufacturing facility without machine shop tools. I’ve worked at a company that had 3d printers in the machine shop. Both forms of manufacturing would work alongside each other to pump out projects.
3D Printers and Jewelry
Another popular sphere that uses 3d printing is the world of jewelry. It’s effortless to set up shop and start making custom jewelry.
3D Printing for Hobbyists
In a general sense, there are a lot of hobbyist applications you might be interested in. Making miniatures, cosplaying, making gifts, fixing things around the house, or prototyping ideas you have for a business.
Automotive and 3D Printers
The last industry worth mentioning is the automotive industry. Some manufacturers will use 3d printers to prototype, make scale models, make custom pieces, and even parts of the final production.
Unique Applications
Using a 3d printer requires a mix of engineering and art. For that same reason, a lot of artists feature 3d printed parts in their art shows. On the other side of things, people are 3d scanning sculptures.
This allows someone else to 3d print the statue for their use. I have an Einstein bust and a mini sculpture of The Thinker in my apartment. Fashion is a fun application since 3d is such a beautiful craft. It should come as no surprise that it’s hit the runway on multiple occasions.
3D Printing on the News
One of the first 3d printing projects that caught the media’s attention was 3d printed houses in China. Yes, you read that right. They used a crane system to act as their 3d printer. The crane laid electric, plumbing, and did the structural work. This company WinSun printed 10 fully functional houses in 24 hours. Another big project that was on the news cycle for a while was a fully functioning 3d printed organ. Not the instrument. A human organ. Doctors made a functional 3d printed liver which opened the door of possibilities. You could specifically engineer transplants for patients.
Yale also caught some buzz for their use of 3d printers in the operating room. They made custom-built 3d printed joint replacements. My favorite story of 3d printing in the news was what the astronauts did with it. They launched a 3d printer up to the ISS where it lives to this day.
The story was an astronaut broke a wrench up in the International Space Station. It cost millions of dollars to send a replacement wrench. Then someone realized that they could just 3d print a replacement wrench for pennies. Thus started the quest for the first interstellar 3d printer.
Benefits of 3D Printing
The first and biggest benefit is cost savings. Another benefit is the time that it saves you. It also allows for very complex geometries to be fabricated. The process allows 3d printers to make unique and customizable parts.
The 3d printing process takes up very little space. You can 3d print threads and embedded nuts or bolts which is impressive. The post-processing work is straightforward. 3d printing is an additive manufacturing process which is a significant benefit. Read below for more in-depth explanations for each bonus.
Savings Cost with 3D Printing
The number one benefit is how low-cost 3d printers are. Insanely low-cost. This is because of a couple of reasons. First, there’s less engineering time that goes into the process. Second, there are no costs associated due to a machine shop. Machine shop costs add up quickly.
Additionally, the machine cost for a 3d printer is exponentially lower than the machines required for the machine shop to operate. Finally, the material cost is so much lower. Let’s figure out what the cost is for the two scenarios.
Time Saved With 3D Printing
This is the next most important thing. 3d printing saves you so much time you wouldn’t believe it. Running a 3d printer takes little to no attention so you can do other things while it’s operating. Running a machine to fabricate a piece takes undivided attention during the process.
You also don’t have to wait for a bunch of other people to become available. The designer could also be the 3d printer person. One person to do the whole process. It saves time on drafting since you don’t need 2d paper prints for your 3d printer.
You don’t need to wait for material because one spool of filament will last a while. Plus, you can have a large backup reserve of filament without taking up too much space or money. If you look at these two scenarios, it’s self-evident how much time is saved. You will have the finished print by the end of the day rather than the week or two that the machine shop will take.
Complex Geometries in 3D printing
Sometimes you need to make a complicated part. It happens. If a machinist is excellent, they can make the part. It takes a lot of skill to be a good machinist. If the part is too complicated, it might be downright impossible to make it in the machine shop.
Sometimes, the only option is 3d printing. 3d printing technology allows you to make some wildly impressive and complicated geometries. Since you can add dissolvable supports to the part, it will enable you to print a lot of weird shapes.
Customized Parts on a 3D Printer
Playing off the last point a little bit, the option for customizability in 3d printing is unparalleled. The rule of thumb is if you can draw it on your screen, it can be 3d printed. There are exceptions of course, and some requirements, but it’s true. You can fully customize any piece you want to make, and your 3d printer will happily oblige.
Small Footprint for 3D printing
It might not matter to everyone, but 3d printing doesn’t take up any space at all. If you have enough room for the 3d printer, you have enough room to run the full operation. The filament can be stored anywhere, and the design work can be done anywhere. A printer is an independent unit.
I’ve seen shops where they had rows and rows of 3d printers butted up next to each other. Alternatively, think of all the machines and space you need to make a piece in a machine shop.
Embedded and Integrated Features with 3D printing
Not a lot of people know this, but you can embed and integrate different features into your 3d printed part. There have been occasions where I fully embedded a metal nut into a 3d printed part. There was a big block of plastic material with a hole in it and a nut in that hole. There are situations where you need this. To machine it, it takes a ton of extra effort. Additionally, if you want to make a doorstop for the bottom of your door, 3d printing makes it easy. You can integrate a screw inside of the doorstop so it can be screwed into the door.
You can also design for things to snap-fit, make living hinges, and latches with a 3d printer. I 3d printed a Lego set that all snapped together for my little cousin. Finally, and most impressively, you can even 3d print fully functional threads. Your part will come off of the print bed ready to have a bolt inserted into it with no machining required.
Fast Post-Processing For a 3D Printed Part
Post-processing is all the work required after machining before the part is completely ready. For a traditional shop, their post-processing is sanding, deburring, grinding, welding, painting, and glass or sandblasting. If you take a part off the mill it will be so sharp it will cut you, so a lot of work goes into refining and perfecting the piece after machining.
3D printers don’t have the same problem. After the print is done, you can grab it right out of the machine with your bare hand. There’s nothing that needs to be done. That doesn’t mean that you can’t do any post-processing to the 3d printed piece.
I’ve had a lot of success sanding pieces. Since the material is a solid color throughout you can sand the outside and it will still retain its color. Even a whirlybird deburring tool works wonders.
Another fun thing you can do is friction weld 3d printed parts. By using an electric drill, put a length of filament in the chuck and tighten it. Spin the drill and push the filament along your print like you’re welding.
The friction welded section is just as strong as the rest of the parts. It’s even stronger than the part if it’s done right. Most of the time you don’t need any post-processing on a 3d printed part. If you decide you’d like to try some, it’s super easy.
Additive Manufacturing, 3D Printing
Additive manufacturing is when you add pieces together until you have the final product. Compare this to subtractive manufacturing where you start with a big chunk of material and cut away all the stuff you don’t need.
Additive manufacturing at its core is a way to conserve material waste. In 3d printing, you only use the material you need to make the piece. In other words, if a piece is 50 grams, you will use precisely 50 grams of material.
Making the same 50-gram piece could take pounds of raw material to machine. The leftover scrap from a machined part is just thrown away. Less waste, which means less cost, and more environmentally friendly.
Limitations of 3D Printing
Of course, there are some downsides to 3d printing. 3d printers don’t allow for strong or load-bearing parts to be made. There’s no ability to scale-up production. Also, the build volume can make you a little claustrophobic. Here’s what I mean.
Low Strength of 3D Printed Pieces
This is the most impactful limitation of 3d printing. The prints are just not as strong as you’d like them to be. There are 3 reasons for this: The available material choices, the process of 3d printing, and the infill in a print. This means that there are applications where 3d printing just isn’t an option. In general, if the piece is going to see any type of load, FDM printing with plastic won’t work.
There are times in the past I’ve used FDM printed plastic for pieces that saw a load, they just have to be carefully designed. There’s the option of metal printing but that will cost hundreds of thousands of dollars. Additionally, SLA printing yields pretty strong results. But for FDM printing, it is not the best choice.
Material Choices Limit the Strength of Your Print
Plastics are the only material you can print with a household FDM printer. Sure, we touched on some hybrid materials. This is the PLA that has carbon fiber, wood, or metal built into it. The truth is these additions don’t improve the strength at all. If you print the same item using every type of PLA on the market, you’ll find that they crush at around the same pressure.
As you probably know, plastic is a lot weaker than metal. That means that anything you 3d print will be weaker than what a machine shop can make. The other property that metal has that plastic doesn’t is elasticity. You can bend metal and it will go back to its original shape just like a springy diving board.
When you bend the plastic, you are permanently disfiguring it. Even a small load applied many times will destroy plastic but not metal.
3D Printing Process Isn’t for Strength
Here’s another thing I didn’t realize until I started testing my prints. The process of 3d printing leads to a flaw in strength. Think about the process of how something is 3d printed. Layers are built on top of each other and fused. From a physics standpoint, each one of these layers is a breakpoint. An excellent way to visualize this is to imagine a stack of boxes. If you hit the stack, it will always fail between two boxes and fall over.
The same is true for 3d printed parts. Depending on how the force is applied, the most likely point of failure is between layers. The problem is these parts can be made of hundreds or thousands of layers. A lot of room for failure.
Infill in a Print Hurts the Strength
The last failure point when it comes to strength is the infill of the part. The infill is the honeycomb pattern on the inside of your print. If you create a 1 x 1 x 1-inch cube, a majority of the inside is going to be the honeycomb pattern. This means a lot of air is inside your print and therefore it’s not reinforced.
A honeycomb is a solid pattern, but it’s not nearly as strong as a solid piece of plastic. If you get access to a 3d printed part, break it in half. You’ll expose the infill. Go ahead and pinch the infill and see how easy it is to break.
So when a part has a force applied to it, there’s very little reinforcing the part. The moral of the story is 3d printed parts make lousy load-bearing objects.
Scaled Production on a 3D Printer
Pivoting away from the material properties, let’s take a look at the future of your printed prototype. You probably know this, but after a part is proven as a prototype the next step is some scale of production. In other words, after the 3d printed part works, you might want to make 100 of the same part for sale or testing.
This is where the 3d printer falls short. 3d printers can’t fulfill a bulk order. The printer will always print the part at the same speed and for the same cost. If a part takes 2 hours to print, it will still take 2 hours even if you need 100 parts made.
Sure, you can stack a bunch of the parts on your build plate and print them at once. It just multiplies how much time is needed. 5 parts printed at once take the same amount of time as 1 part printed 5 times. Whereas other manufacturing processes like machining or injection molding thrive on bulk orders. For other methods, you get a great discount for bulk orders and a ton of time saved on each part.
3d printed parts cannot scale production up, they will continue to make one-off pieces or low-quantity projects.
Small Build Volume on a 3D Printer
Another shortcoming that’s worth discussing is the volume limitations of a 3d printer. Each printer has a finite volume it can build within. If a printer says its build volume is 10 x 10 x 10-inches, there’s no arguing with it. It simply won’t make any part bigger than that. There are ways to design around the build volume and tweak your parts so you can make them. Maybe you have to print it as two parts and combine them.
This doesn’t change the fact that your build volume might limit you. Compare this to traditional machining methods. The volume you can work with on machining tools is enormous. It can even be expanded with some ingenuity.
If all else fails a machinist can use hand tools instead and grow their working volume even more. 3d printers’ build volume limits the size of projects you can work on. You could always get a bigger printer, but it could be a waste of money for a one-off piece.
Who is 3D printing For?
Honestly, 3d printing can be used for anyone. The technology is getting better and it’s allowing for smaller and less expensive home printers. Even if you’re just interested in the technology of 3d printing, it’s for you. You don’t have to be a designer. There are sites online where people will post 3d printable files. You download the file, throw it over to your machine, and it starts printing.
You don’t understand the true use of a 3d printer until you’ve got one in your house. I converted a handful of my coworkers to get a 3d printer for their house and I would love to hear the different projects they printed. It’s a great resource for cheap gifts for family and friends.
It’s the perfect technology for people who like to DIY, tinker, or experiment with things. You don’t have to know anything about the 3d printer or how to design a piece to enjoy having one. Most printers are really easy to use and require very little upkeep.
On top of that, the 3d printing community is so strong. Anytime I ran into an issue, a Google search revealed dozens of different forums where people are discussing my exact issue. No one who has a 3d printer is alone. For these reasons, I think 3d printing is perfect for anyone and everyone. That being said, let’s check out the costs of buying and operating a 3d printer.
How Much Does It Cost to Start 3D printing?
Of course, 3d printing is not as expensive as you would think. For less than $250 you can be fully set up and ready to print. That includes everything you need, spare material, and a decent printer. There’s a printer called a Creality Ender 3 that is widely hailed as being an incredible printer and it’s less than $190. Factor in another $50 for material and a spare hot end. You still have enough room in your budget for coffee before hitting the $250 threshold.
They have an upgraded model for some extra cash, and there are many other printers at a higher price point. A quick price breakdown looks like this: $250 for people starting, $500 for more serious printers, and $750 for high-quality printers. $1,000 and higher for semi-pro and professional printers. The Creality Ender 3 is the lowest price possible to get a higher-quality print.
Conclusion
Well, that was a lot of info, wasn’t it? I’m glad you made it down here. Hopefully, this article answered every question you had about 3d printing. It probably led you to even more questions before answering those too. 3d printing has so many benefits and it is a great method of making something.
It’s a simple-enough technology that seems to have applications in every market. 3d printing is a technology that isn’t going anywhere. There’s a huge community that’s fascinated with the technology for the same reasons discussed in this article.